Showing posts with label garden. Show all posts

Tuesday, July 10, 2018

DIY - The Bird Feeder

We have a BIG problem with wild animals in our area, and it's funny because we are about 1 block from one of the busiest main arteries for traffic.  All this wild life is crazy! We have deer by the herds, raccoons, foxes, opossum, groundhogs, squirrels, vultures, occasionally wild turkeys, all kinds of birds, have had a blue heron fly into my yard, turtles, frogs and now something new that makes sounds like I have never heard before, don't know what it is, but it's pretty scary.

We both love watching the birds, and used to put a lot of bird feeders out, then we stopped.  The deer, raccoons, squirrels and lord knows what else is lurking out there, would eat all the seed before the birds could get to it.  The animals would knock the bird feeders down or drag them into the woods and eat everything.  So the hubby and I decided to build, hopefully an animal proof, bird feeder.  So far, so good, it's been hanging for about 2 months now and nothing has gotten to it.

We decided it had to be 10 feet or taller, because a deer when it stands on its hind legs is about 10 feet high or taller.
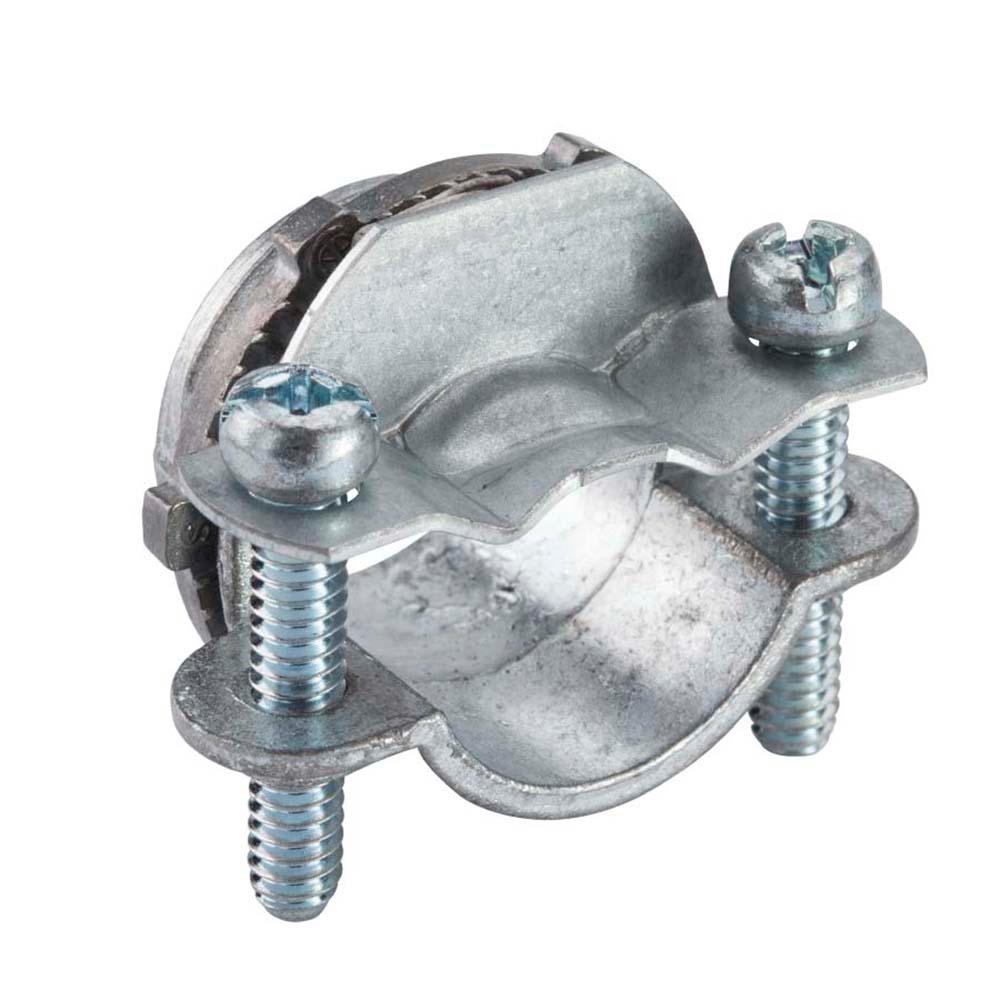
To make the feeder pole, we purchased a 10 ft  4"x 4" treated deck post, a 6 ft 2" x "4 treated piece of wood, a 4" x 3" block of wood, wood screws, 2 pulleys, a dock cleat, a metal eye snap hook to hang bird feeder, 2 cable clamp connectors, vinyl coated cable wire and an in ground easy spike.

How we made it:
Saw the 2 x 4 in half and attach to either side of the deck post at a 45 degree angle (for added height). Secure the smaller 4" x 3" block of wood between the angled pieces of wood.
Attach one pulley to the top of the 10 foot post and the other pulley to the small piece of wood between the angled wood.  Make a loop at the end of the cable wire, and use the clamp connectors to secure and tighten the loop, so it stays in place to hold the hook for the bird feeder.  Thread the cable wire over the pulley on the angled pieces of wood and down and over the pulley on the big post.
Attach the dock cleat on the back of the 10 ft post. Attach the hook for the bird feeder to the cable wire where you made the loop.
Small block of wood between the angled pieces of wood.  This is what clamp connectors are.
                  
In ground easy spike post holder.  Just hammer into the ground, place post inside and secure with nuts and bolts. CAUTION:  This spike is big so make sure there are no underground pipes or cables wherever you put this!
12-Gauge Black Powder-Coated E-Z Spike
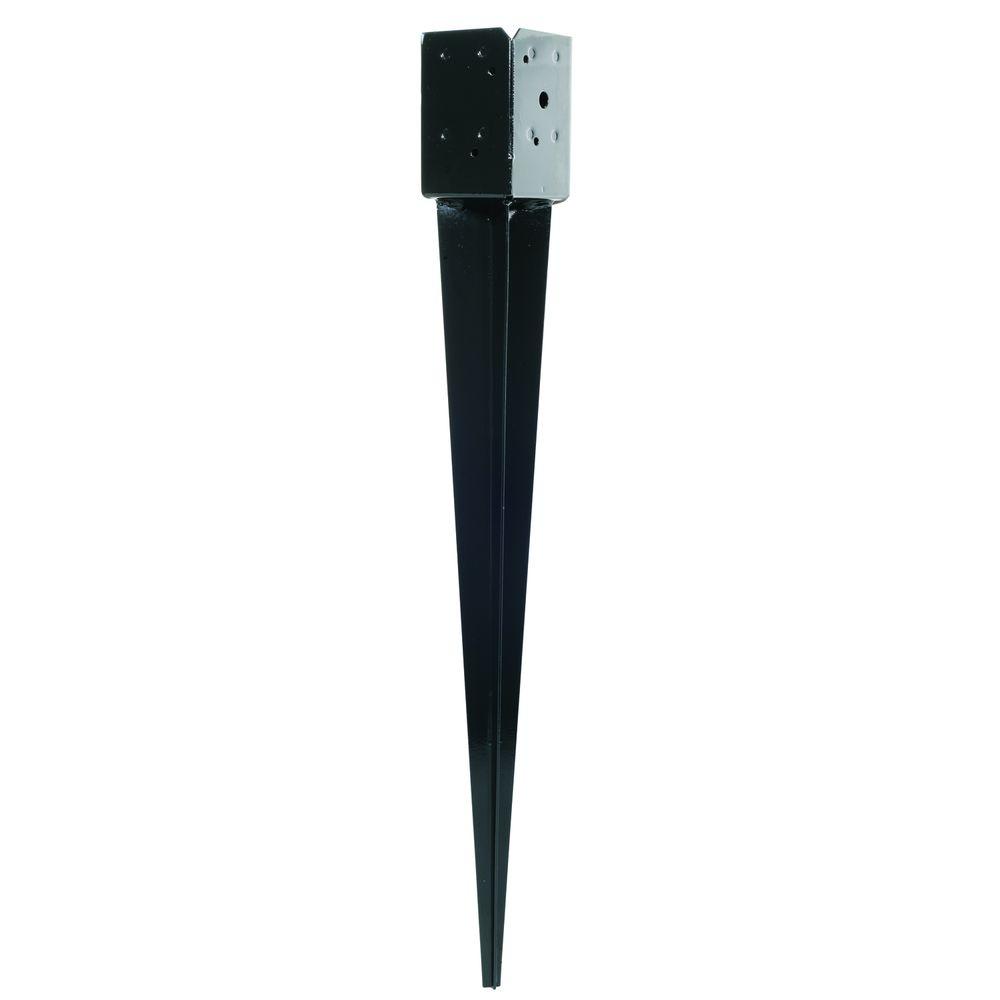
Post is secured in the easy spike post holder secured with nuts and bolts.
Dock cleat hook and vinyl coated cable wire.
Last, attach your filled bird feeder to the hook, pull on the cable wire to the top.  Tightly wind the cable wire around the cleat, and secure in place to hold the feeder up on the top.  You can paint the wood if its dry before you hang your feeder.  My wood was still wet, so I haven't painted it yet. 
ENJOY WATCHING YOUR FEATHERED FRIENDS!


Monday, May 22, 2017

It's Time For Bee-utiful Gardens!

Yes my friends, it's that time again. Spring has sprung and now the hard work begins.  Cleaning out flower beds and making the house look pretty again after winter.  It's a lot of work, but the end result is to sit back and enjoy all your hard work.  The hubby and I moved 5 yards of pure black gold mulch to spruce up the the flower beds and nourish the plants, bushes and trees, they need to eat too!  So while I was out there, this little guy was having a good time searching for pollen.  I love the bees,  they are so good for our environment.

Coming in for a landing and nailed it!
 These are a new garden attraction for Mason bees, The Mason Bee House.  Mason bees don't sting, they are gentle little pollinators. Found this pretty house at Target for $14.99. Hang it facing the morning sun to "wake" your bees up to start work pollinating.
 OMG, Heeeeee's back!  The ground hog, my arch nemesis, he has to go!  He eats or ruins everything, digs huge holes in the gardens, takes out beautiful, growing bushes every year.  I have now resorted to sticking cat feces in his hole to get rid of him, I know it's gross, but I had no other choice, I physically do not want to harm him.  It does work by the way, so far, so good.
 Bleeding Hearts, one of my favorites and lots of Rhodies.
 Another one of my favorites is Irises, so old fashion, love them!
 My small herb garden is planted and growing.  Fresh herbs are the best in the Summer, or all year round for that matter.  I use a lot when cooking on the grill.
 The lavender grows like a weed around here, it' so calming and soothing.
 Got my local tree guy, AKA the hubby,  to cut two cedars down that got damaged from heavy snow.  Replanted a cherry tree in their place.
I planted this honeysuckle last year and didn't expect it to live.  To my surprise it did and it's beautiful and fragrant. It wrapped itself around my deck railing.
 A little shelter for the birds, away from the house.
 Beautiful Peony grew inside my globe garden ornament, they are so pretty!
 I grow a few different kind and colors- hot pink, blush, pale pink and pink with white center.
 When they bloom I always have bouquets of them around the house.  I mixed this one with Lamb's Ear.
 The house is almost in full bloom now except for the Crepe Myrtles, they will bloom very soon.
And here comes another one of my arch enemies this time of year, destroying a tree right now.
It's time to grab your shovels, rakes and gloves, and get moving in your garden.  It really is good exercise, and you can enjoy the fruits of your labor for the rest of the growing season.  HAPPY GARDENING!

Tuesday, June 30, 2015

A Little Bit Of Dirt And A Lotta Love!

Way back in May I started my vegetable garden, my son rototilled a patch of soil for me to get it started.  I love having fresh vegetables in the Summer, and planting and growing your own beats paying for them.   I can go right out to my patch, pick what I need right from the vine, pesticide free.  It keeps me busy though, caring for it, watering, keeping groundhogs and deer out of it, it's like a smorgasbord for them.  I'm sure they share the news with all their animal friends that WE have a garden and it's free eats for all of those who hang out in the woods!  So far so good, they haven't touched it, but things aren't ripe yet, so we'll see how it goes.

This is the size of my patch on May 3rd.....
Veggies getting started on May 8th.....
Growing fast, so I staked everything on May 23rd......
And BOOM BABY, a month later on June 23rd!  Look at the size of everything.  What I have producing already, 5 kinds of tomatoes, peppers, zucchini, yellow squash, eggplant, kale, 3 different kinds of beans and fennel.  These veggies will come in later, corn, beets, cucumbers, peas, carrots and onions.  It looks great and can't wait to start picking and eating from the vine.


Wednesday, May 20, 2015

Spring Has Been Kind This Year

I go through the planting ritual of Spring every year, sometime Spring is good to me and sometimes not.  In the past Spring has been very hot, more like Summer temperatures, and no rain.  When that happens, it's very hard to keep up with the watering, and some plants and flowers just don't tolerate the heat well.  I have alot of trees around the property, but there is also alot of sun.  The sun burns plants and flowers out, even if they are supposed to be planted in the full sun, that's how hot it gets here.  So this Spring has been kind to me and my plants, so far.  Everything is coming up nicely, including the vegetable garden (more on that later).

Pretty pot of petunias and a mandevilla on the font step.
 The rhododendrons in full bloom, and the knockout roses are peeking their heads out!
The peony garden is poppin'!  These are my absolute favorite flower.
I have them in all kinds of sizes and colors.  I covet the yellow peony, I want them for my garden.
I have a long row of peonies in front of the house, and can't wait until they all open, they are so pretty.


Friday, May 8, 2015

Crafts and What Not

I'm trying to get the house done before summer and decided to spruce up some wreaths that I had in the garage.  They weren't in bad shape, they just needed to have the faded flowers removed and new ones glued on, I also added some new bows.  Just a couple of bucks and they look like new.

This wreath also gets flags put on to the right side to even it out.  I hang it every year on the front door for Memorial Day, Flag Day and July 4th.
 Took a plain grapevine wreath and added some sunflowers, lavender and a burlap bow for summer.
The yellow flowers on both of these wreaths were faded and dried out so I replaced them with new yellow flowers and made them look happy again.
 The hubby and I also made this pebble stone walkway between the deck and the shed that leads to the backyard.  It has been a thorn in my side since the shed was delivered about 9 years ago.  We needed the stepping stones in there because it's kind of damp and wet all the time.  You could not use the lawn mower to cut it, you had to use a weed whacker which always looked sloppy.  This year, yes after 9 years of trying to convince the hubby,  I FINALLY got the pebbles and re-set the pavers, looks so much better and no grass to worry about.  You can see how bad it was in the picture on the right.  First we layed weed preventing cloth, then staked it into place.  About 10 bags of pebbles ($3.29 each), the pavers I got 8 of them for $5 at a yard sale a couple of years ago and the weed preventing cloth was $1.00 for a whole roll on clearance, the walkway cost us about $39.00, not to bad to improve such a hard space, now it looks much nicer and neater.