Showing posts with label glitter. Show all posts

Friday, December 4, 2015

The Christmas Spirit Has Begun

I finally got the tree up, after tossing around the idea of getting a fresh one this year, I used the artificial instead.  I love the scent of a fresh tree, but I just don't like the mess and I need to get a big one because of the size of the room it goes in, they are very expensive.  Having 18 foot ceilings is a job when it comes to getting a tree, a small one just doesn't look right in the room. I purchased this pre-lit, 3000 light tree, about 10 years ago and it still looks good.  It's a 15 footer, but this year I took out the bottom section so it stands about 12 feet high.  I'm a shorty and can't reach the top any more, even using a clothes prop doesn't help.  I tested all the lights before assembling the sections and they all worked, and yes you guessed it, they didn't work when I got the tree up.  There were about 300 of them out and to go through all of those was just not going to make me happy.  So off to the store I went and purchased 500 new lights.  I plugged them in end to end, started at the top of tree and filled in all the way down to the bottom.  It looks great!  Then I started to decorate it, usually takes me a day, but took two days because of the light debacle.  Now my Christmas spirit has begun!
Catwalk is done on both sides.
Front stairwell is looking festive!
On the front steps, lanterns are lit, decorated with plaid bows and snowflakes, just have to fill in with poinsettias.
Now I am getting ready for my Annual Christmas Cookie Baking Party.  I have this party every year with a few of my friends and family, this year I am hosting 15 people for a day of baking cookies and a nice luncheon.  We'll bake over 2500 cookies for all of us to share, it's fun but hard work, and in the end all of our cookies are baked and decorated in one day.  We all get to spend time with each other, share laughs and news, and I have to say there is some imbibing of wine or whatever, while all this is going on, it relaxes the muscles, hahaha!

SO, I wanted to get some ideas for my table scape for lunch that day.  I wrapped these linen napkins, that are kind of sparkly, in red and white baker's twine, added a handmade stamped place card, a jingle bell and some fresh greens.  I am using red chargers, and instead of my Christmas china, just plain creamy white plates.  I also used an off white, silver and gold plaid tablecloth, as well as some red plaid vintage scarves across the table for more red color.
Glitzy reindeer and a sled full of shiny and glittery Christmas balls down the center of the table.
 I found these faux birch tree branches at Lowe's, they were so unusual, so they came home with me.  I thought once I get the fresh greens on the table (photo later after it's done) I would use these too.
 For three branches, about 27" long, they were $4.98. They are also beaded so they add shine too!
Also at Lowe's were these beauties, 20" fine glittered champagne colored bottle brush trees, with red berry clusters and clear beaded branches mixed in. They come in a clear decorative glass stand, $24.98 each.  I added the matching champagne colored snowflakes to the top.
 
To tie in my birch tree branches,  I had these birch and pine cone candle holders in a box of things I was not going to use, so I put them on the hutch with some fresh greens and red and silver Christmas balls.  When the whole room is finished I will post a photo.
  HAPPY DECORATING!


Wednesday, October 8, 2014

Crafty Snowmen

My youngest, who is in France for her Junior year of college, just informed me she is coming home for Christmas.  I am so happy, we were worried about the expense, but flights were relatively cheap for that time of year. I am so excited, I can hardly contain myself!  I thought I was not going to see her for a whole long year.  Now I can't wait to set eyes on her.  I was not even going to decorate for the holidays, but now I am ecstatic to do so.  She will walk into the house, when she comes home,  and it will scream "Welcome Home".  She is already planning her coming home meal too.  I have a lot of decorating to do, so to get in the mood for the upcoming Christmas season, I broke out some of my craft items and made some cute little snowmen ornaments, that can also be used as gift tags if you like.  I made some of these before (check out Crafty Crafter from 10/18/13 on this blog), these are a little different.

I set out a piece of foil, so nothing sticks to the counter top, and it also catches any messes.  I made a snowman stencil on my computer to use as a guide.  I recycle things in my house, so the cardboard I got from my cat food boxes, they layer these in between the cans of cat food, instead of throwing them out I save them and use them for crafts.  They are a perfect size for the snowmen, 7 1/2"  x  5 ", makes 2 snowmen cutouts.  I set the stencil on the cardboard and......
 Trace over it, then cut it out.  I also made little hats for snowmen.
 Two snowmen cutouts and two hats.  I also recycled old music books.  A few of my kids played a lot of different instruments so I have a lot of books.  I then trace the cardboard onto the music sheets. I traced these on the diagonal.
 I  used a pencil to trace them.  Use space on the music paper to your advantage to get more cuts out of one sheet.
 Two snowmen and hats ready to be glued together.
 I used a glue stick, but you can also use Mod Podge.   A popsicle stick run flat from end to end, helps the paper adhere to the cardboard.
 Two glued together.
 So when I am out and about and I see little inexpensive things like this, I pick them up.  This is a whole pack of 8 colored extra fine glitter for $4.99 at Marshall's.
 This is another pack of 5 colored extra fine glitter that I found on clearance for $1.00 at Marshall's
I used the glue stick and the black glitter for the hats.  I used a piece of waxed paper to catch excess glitter, so I could put it back into the tube, no waste that way.
 Hats covered in glitter, and I found snowman face rub ons at Michael's for the snowmen.  Just cut them out and rub on the snowmen, or you can draw the faces on. 
 Faces on, I then used the glue stick to cover the front of the snowmen, then sprinkled iridescent white glitter all over them so they glisten.  I used scrapbook paper for the scarves and glued them on.
 Embellished the scarves with sequins and used thin wired tinsel garland to embellish the hat and for the hanger.  I glued the hanger on with a glue gun.  I then cut the bottom of the scarf with decorative scissors to make it look like fringe.
 Cute little faces.......
Ready to be hung on the tree.  This is last year's Christmas tree, and yes it is a real tree, perfect 15 feet of the best smelling Fraser Fir!  All decorated in snowman.


Friday, October 18, 2013

Crafty Crafter

This time of year I am always looking for things to make or transform.  I found this chalkboard at Marshall's in the clearance bin for $7.00, so I took it home, took it apart, and painted the frame with a textured rusty spray paint, and then re-painted the chalkboard with black chalkboard paint.  It now looks old and rusty!  I will use it in the foyer with seasonal greetings written on it.  I may even decorate it with small garlands.
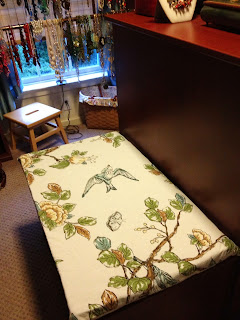
It has taken me 7 years to cover the seat on the island in my closet and I finally did it!  I recycled an old heavy shower curtain that I loved, it shrunk in the dryer, and I already had the foam and batting to make the cushion.  Here is a TIP:  Cut your foam with an electric knife.  Measure it and mark it off with marker, then cut.  It is so much easier than using scissors, and the fabric stores only give you one free cut.  
    
Vintage mirror: I painted the frame silver and the mirror with chalkboard paint. I am going to hang on a Christmas wreath and write Merry Christmas on it. 
These snowmen I made for my sister to hang on her tree.  They are made of cardboard and old sheet music glued together then cut into shape. I drew the faces, stars and hearts on, burned the edges of them, then decorated them with iridescent glitter.  They have glittery garland scarves, pipe cleaner arms and twine hangers.
This was an old ugly 1970's tan chair with ripped vinyl seat, that my daughter was using at her desk in her bedroom.  I sanded it, spray painted it black and covered the seat with a white and black pin dot fabric to match her room.  Always remember...... spray paint is your friend!