Tuesday, December 25, 2018

Wednesday, October 24, 2018

Happiness Is An Old Rocking Chair

My beautiful grandson was born in April, and we are so delighted he is here, we love him so much. I can now understand how my friends who have grandchildren said they felt when their grandson/granddaughters came along.  There is no feeling like it, it's not the same as when you have your own children.  Although I love my children with my whole heart and still would take care of and protect them, having a grandchild is so very different, I just can't explain it.

I took over his nursery decorating the day I found out he was coming.  I was thrilled to be able to do this for his parents and for him.  He had everything he needed in there, crib, dresser, changing table, bureau, all the decor to complete his room, and a brand new rocking chair with an ottoman that his mommy got for a shower gift from her sister, he was all set.  But, downstairs where his mommy would feed him most times, there was no rocking chair.  I just happened to have two of them, and both are antiques.  One was my mother's, which was a colonial design from the very early '70's, and the other was from my husband's family which was over 100 years old. As I was looking over the very old chair, I discovered that it was handmade, that made it even better.  I held on to it for years, even though it was taking up space in the garage, because I couldn't part with it. I knew someday hopefully one of our four kids would have a child, and lucky us finally one of them did!  Now I had to decide which one I was going to give to them. Looking at the rocking chairs side by side, I knew the colonial style was out. It didn't match their decor, so I opted to redo the older one, which actually had a more sleek, modern look for it's time.  Funny how that works, fashion and style always come full circle.

When I started this project, I had a little bit of a problem with it.  First, one of the arms was broken. Being that old, I had to piece it back together very carefully.  Second, it was loose in a lot of places and had to be tightened up. Third, sanding it was a huge problem.  I'm not sure what kind of lacquer, polyurethane or whatever they used back all those years ago, was a bear trying to get it off, but I didn't do too bad.  I bought a can of paint that had a primer in it but when I started to paint, the red stain on the chair would seep through it.  So, I did a second coat, same thing happened.  Now frustrated, I opted to use a spray primer, in gray, to try and fix the problem.  By golly, it worked!  Then I bought a can of creamy white paint called Smokey Beige from Rust-oleum, and spray painted the chair. It came out so beautiful I wanted to keep it, but I had to remind myself it was for my little man.   

So here is the problem chair, as I started out.  Not looking too good.
This is the paint and primer that I bought, and with a little help from my friend the primer, it's starting to look good! I actually love the color of the primer. 
First coat going on.......
A lot of nooks and crannies to cover.......
Just about done........
And look at it now! What a difference a little paint makes.  Remember, spray paint is you friend!
A new cushion was made for the seat. I had to semi fit it, the seat is really wide on this chair from front to back and side to side. I cut the foam cushion with an electric knife, the best way to cut by the way, gives an even clean line. 
 And now it was complete for his mommy to rock the day and night away with him! I hope my sweet boy Jaxson loves it, keeps it for many years, and passes it along to his children.
Love your Nonna and Zia!


Monday, October 22, 2018

Fast and Easy Delicious Meal

I was browsing around my local Giant store looking for something interesting to make for dinner and found these babies, Bourbon Black Pepper Marinated Beef Sirloin Tips. Now, I don't usually buy stuff like this because I am always afraid the meat will be tough, but I broke down and bought a pack of them anyway to try them out. I have to say they are one of my new favorites! They are so easy to make, flavorful, tender and delicious.  Some of the different ways to serve them - you can make shish kabobs, mix them with vegetables, serve over rice or noodles, or just add some sides dishes like I did.  All in all I give them an A++.

 Here is my pack of beef tips. One pack served two of us.
The tips were cut in rather large pieces, so I cut them into about 1 inch pieces.  I caramelized them in a little extra virgin olive oil, took the tips out of the pan, and sauteed my favorite portobello mushrooms to mix in with the tips when I served them.
 OOOH, looking tasty!
 I served them up with a brown and wild rice vegetable mix, roasted asparagus and a garden salad, YUMMY!  This meal took about 20 minutes to make and it looks like it took longer.  So browse around your favorite grocery store, you never know what good things you might find.

Sunday, October 21, 2018

Catching Bugs!

We bring a lot of fresh fruit and vegetables into this house, and along with that unfortunately also come the fruit flies.  I can't stand those little buggers!  Flying all around, landing on food you are about to eat, they are disgusting.  I have been in combat with them for years, but not anymore. I finally found a solution that really works to get rid of them.  It's simple, and only requires two ingredients I always have in the house - apple cider vinegar and Dawn dish soap.  Pour about an inch of vinegar into a small bowl or ramekin and add a few small drops of Dawn.  Mix together with a spoon and set the bowl(s) out on the counter and watch it catch them.  The vinegar attracts the fly, the Dawn provides a layer on top of the vinegar, so once the fly goes in, it can't get back out.

My two ingredients.
I set one ramekin out by the fruit bowl, but you can hide them around the kitchen if you like. I use two of them, one on the counter and one on the island.
Just over night and BOOM baby caught one! After you have caught a few, change the solution and mix up some fresh bowls. 


Friday, September 28, 2018

The Moistest Orange Olive Oil Cake

One of the desserts for my Italian Dinner Night was an Orange Olive Cake, oh my gosh was it awesome! I love anything citrusy, and this cake was soooo good.  It was moist, that is always at the top of my list when eating cake. It was especially good because there is no frosting on this cake, it doesn't need it! I made two cakes for my dinner and by the end of the night, all but two small pieces were left.  It was a fan of everyone, as some took pieces of it home and wanted the recipe.  I served my cake with fresh whipped cream on the side sprinkled with a little orange zest.

This cake is going to be a staple in my house.  The hubby loved it, we were fighting over the last piece of the cake, shame on us, we know how to share!

This is one of the easiest cakes I have ever baked, and outside of my homemade chocolate cake, this one is a number one too.  This is how I made it.
Recipe below.
To print recipe, click on it, highlight and print.
To view photos in a larger format, click on them.

Simple ingredients is all it takes to make this delicious cake and I always have these ingredients in the house, so I didn't have to run to the store.
 Spray your spring form pan with baking spray, cut a round of parchment paper by tracing around bottom of pan.  Cut inside the trace mark, place the round in the bottom of pan.
 Zest oranges, and start mixing ingredients together.
 Don't forget to wrap outside bottom of pan with foil.
 Cake is done and cooled.
 There it is in the back, dusted with confectioner's sugar and looking pretty tasty!
Orange Olive Oil Cake

Ingredients
zest from 1 1/2 - 2 oranges, I like a lot of zest in it for more flavor
1 3/4 cups unbleached white flour
1 teaspoon baking powder
1 teaspoon salt
1/8 teaspoon ground cardamom, optional (see note)
3 eggs
1 1/4 cups sugar
3/4 cups regular extra virgin olive oil, do not use flavored oils
3/4 cup Simply Orange No Pulp Orange Juice
Confectioner's sugar for dusting on top of cooled cake

Directions
Preheat oven to 350 degrees. Spray a 9 inch spring form pan with cooking spray. Place a round of parchment in the bottom of the pan and spray lightly with cooking spray. Wrap the outside of the pan bottom in heavy duty foil to catch any leaks.

Zest oranges, set aside.  Whisk together flour, baking powder, salt and cardamom (if using), set aside.

In large bowl, beat eggs on medium high with mixer until broken up and combined, about 1 minute.
Slowly add sugar and continue beating until light and pale yellow, about 3 minutes. On low speed, alternate adding the flour mixture and oil to the egg mixture, beginning and ending with the flour mixture. (1/3 flour, 1/2 oil, 1/3 flour, 1/2 oil, 1/3 flour) mixing until mostly combined after each addition.  On low speed, add the orange juice and zest until all is combined.

Pour batter into prepared pan.

Bake for 50-60 minutes or until cake tester/toothpick inserted in center comes out with just a few moist crumbs.  If you notice cake starting to get really brown, tent a piece of foil over the top for the remaining baking time. Remember all ovens are different, mine took exactly 55 minutes. 

Remove  from oven to a cooling rack, allow to cool for 5-10 minutes in pan.  Take a paddle knife and go around the edge between the pan and cake to loosen it from the ring.  Remove ring around spring form pan and allow to cool completely on a rack.

Cover cake and let sit overnight.

Dust with confectioner's sugar and serve. Make 1 cake.

NOTE: Cardamom has a spicy, herbal, citrusy, smoky flavor to it.  The 1/8 teaspoon this recipe called for gave this cake a hint of the taste. If you want more of that taste, use your judgement and use more Cardamom, but if you don't like it or are allergic to it leave it out.


Wednesday, September 12, 2018

Pep, Pep, Pepperoni!

Our Italian Pasta Dinner Night is this weekend, a little later than previous years.  It's a night filled with family, good friends, food and drink.  My family and I prepare a full course Italian meal, all made from scratch, from the appetizers to dessert and including the limoncello!  It's a lot of work, but with everyone pitching in it's a lot of fun too, and at the end of the day well worth it.

One of the appetizers that I added this year to my antipasto platters is pepperoni chips.  These little crunchy pieces of spicy meat are delicious.  They are so easy to make and eat, because they are finger food, but watch out these are addictive as I found out! I couldn't stop eating them as I was making them, not really a breakfast item I might add, but hey I had to taste test them, right!

I made about 2 lbs of pepperoni chips because I am feeding a crowd.  I purchased 2 big 1 1/2 lb bags of sliced pepperoni at BJ's and didn't quite use the whole second pack.  Preheat the oven to 350 degrees. Line a medium size bowl with foil and set aside. Cover your baking sheets with foil to avoid some of the mess and catch the grease that drains out of the pepperoni. Put a cooling rack on top of the foil lined baking sheets.  Line the pepperoni slices on the cooling rack but don't crowd them. I fit 5 slices across starting at the short end. 
Bake for 7-8 minutes, depending on your oven, until crispy.  
Remove from oven, slide off of cooling rack and drain on paper towels.  Now, if you work fast on getting them off the rack and onto the paper towels while they are still hot and a little soft, you can blot them on top with a layer of paper towels by pressing just very gently to absorb the grease but be careful not to break the chips. The chips will get crispier as they cool.
This is what that medium size bowl lined with foil is for.  Drain the fat off the baking sheets in between each batch of chips so it doesn't burn or smoke in your oven.  Easy peasy on the cleanup, just let it coagulate, fold it up and toss it in the trash can.
Enjoy your pepperoni chips for snacking, in salads, or on an appetizer tray mixed with cheeses, roasted peppers and olives.  Store the chips in a tightly sealed container, will keep for a few days at room temperature.

Monday, July 16, 2018

Grilled Salmon with Lemon Butter Sauce

It's Summertime,YAHOO!  And that means every meal we eat goes on my grill.  Keeping the house cool is the goal, I don't like high power bills they make me sad.  So the easiest way to cut the air conditioner from running is to keep all the heat outside. I cook breakfast, lunch and dinner out there, and it doesn't matter what is on the menu, I adapt all of it to the grill.

This past week I made my Salmon with Lemon Butter Sauce.  Pulled out my grilling basket, placed two nice sized pieces of  salmon for the hubby and I into it, and on to the grill it went.  In a slight 8-10 minutes my whole meal was done, it was easy and delicious.

I purchase a lot of my salmon from either Costco or Trader Joe's.  Costco offers larger pieces that I cut and divide into freezer storage bags, and Trader Joe's offers smaller pieces that are already frozen.  I am picky though, I do not like skin on my salmon, it grosses me out, and I can buy skinless pieces of salmon at both stores. Check it out, this how I made it.

I would not recommend putting salmon on the grate on your grill.  It has to go in a basket like the one I have shown, some kind of grill pan or make foil packets.  In a bowl, I melted 1/2 stick of butter, 1/4 teaspoon of Pink Sea Salt, 1/4 teaspoon of Cracked Black Pepper and juice from 1/2 of a lemon.  Slice the other half of the lemon for lemon slices to garnish the salmon.  Place the the salmon pieces in the basket on top of the grill, close and secure the basket.  Grill on each side 3-4 minutes, depending on the size of your pieces, or until the fish is flaky but moist.
I served my salmon with Roasted Herb Potato packets done on the grill, a small side salad always present in the summer with my dinners, and fresh homemade Raspberry Iced Tea.


Tuesday, July 10, 2018

DIY - The Bird Feeder

We have a BIG problem with wild animals in our area, and it's funny because we are about 1 block from one of the busiest main arteries for traffic.  All this wild life is crazy! We have deer by the herds, raccoons, foxes, opossum, groundhogs, squirrels, vultures, occasionally wild turkeys, all kinds of birds, have had a blue heron fly into my yard, turtles, frogs and now something new that makes sounds like I have never heard before, don't know what it is, but it's pretty scary.

We both love watching the birds, and used to put a lot of bird feeders out, then we stopped.  The deer, raccoons, squirrels and lord knows what else is lurking out there, would eat all the seed before the birds could get to it.  The animals would knock the bird feeders down or drag them into the woods and eat everything.  So the hubby and I decided to build, hopefully an animal proof, bird feeder.  So far, so good, it's been hanging for about 2 months now and nothing has gotten to it.

We decided it had to be 10 feet or taller, because a deer when it stands on its hind legs is about 10 feet high or taller.
To make the feeder pole, we purchased a 10 ft  4"x 4" treated deck post, a 6 ft 2" x "4 treated piece of wood, a 4" x 3" block of wood, wood screws, 2 pulleys, a dock cleat, a metal eye snap hook to hang bird feeder, 2 cable clamp connectors, vinyl coated cable wire and an in ground easy spike.

How we made it:
Saw the 2 x 4 in half and attach to either side of the deck post at a 45 degree angle (for added height). Secure the smaller 4" x 3" block of wood between the angled pieces of wood.
Attach one pulley to the top of the 10 foot post and the other pulley to the small piece of wood between the angled wood.  Make a loop at the end of the cable wire, and use the clamp connectors to secure and tighten the loop, so it stays in place to hold the hook for the bird feeder.  Thread the cable wire over the pulley on the angled pieces of wood and down and over the pulley on the big post.
Attach the dock cleat on the back of the 10 ft post. Attach the hook for the bird feeder to the cable wire where you made the loop.
Small block of wood between the angled pieces of wood.  This is what clamp connectors are.
                  
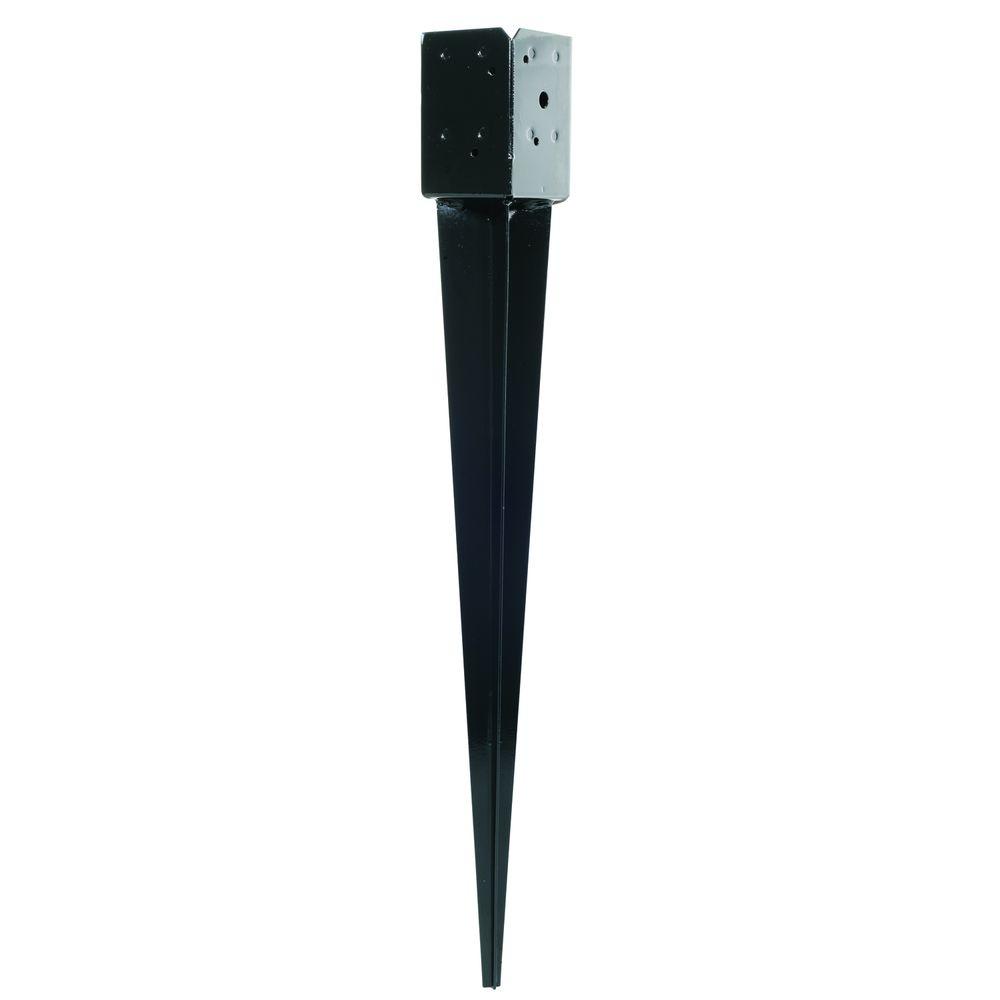
In ground easy spike post holder.  Just hammer into the ground, place post inside and secure with nuts and bolts. CAUTION:  This spike is big so make sure there are no underground pipes or cables wherever you put this!
12-Gauge Black Powder-Coated E-Z Spike
Post is secured in the easy spike post holder secured with nuts and bolts.
Dock cleat hook and vinyl coated cable wire.
Last, attach your filled bird feeder to the hook, pull on the cable wire to the top.  Tightly wind the cable wire around the cleat, and secure in place to hold the feeder up on the top.  You can paint the wood if its dry before you hang your feeder.  My wood was still wet, so I haven't painted it yet. 
ENJOY WATCHING YOUR FEATHERED FRIENDS!