Thursday, March 31, 2016

Fashion Thursday - Shopping At The Mart

I am so excited, a new Stein Mart opened in our area, I have never shopped at this store before.  I went with my good friend, girl's day out, spent a few hours shopping and then we had a nice lunch.  I am ready to say, I LIVE THIS STORE!  Great discounts, quality clothing, designer shoes and things for the home. Everything in one store makes it one stop shopping.

So, I got this floral skirted striped bodice dress, don't really wear dresses that often, but I have been seeing a lot of this style in all the magazines and sale papers.  I bought one for summer, you can dress it up or down as I did with black caged sandals or navy gladiator sandal (both from Dressbarn) and denim jacket that I already had.  Nice for a Spring or Summer evening out with the hubby.
 Stepped out of the box with this outfit, but I love it!  It's comfortable and stylish.  Navy, white and fuchsia palazzo pants, crocheted trim peasant blouse and navy gladiator sandals.
 This hi-low, gold beaded trim, scoop neck top, was paired with leopard print jeans, black caged sandals, coral clutch and gold jewelry I already had.  I see another fun night out soon! 
 My new fav boyfriend jeans, paired with a white crocheted top and matching tank, navy and white Jack Rogers sandals, coral bag and jewelry, for a cool Summer night out.


Tuesday, March 29, 2016

Fashion Tuesday - Boyfriend Jeans

Boyfriend Jeans, if you don't own a pair, get a pair!  They are the best jeans I have ever worn.  Let me just say why they are my favorite pair of jeans, 1) they are forgiving, 2) they are comfortable, and 3) they are versatile, you can dress them up or down.  What more could you ask for in a pair of jeans? I bought mine at Dressbarn, I started out with one pair, then ran back and bought another, with coupons of course, don't leave home without them. These fit perfect, no pinching, no riding up or falling down, they have stretch in them and you look great when you're wearing them!
To view photos in a larger format, click on them.

I paired them with this top and sandals from Dressbarn...
 With this cardigan from Dressbarn, a tank and gladiator sandals.
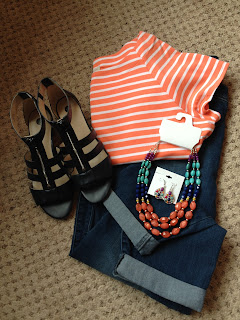
 Orange and white stripe t-shirt and navy gladiator sandals from Dressbarn, necklace and earrings from Kohl's. 
 White jacket with zipper detail, mint green t-shirt, jewelry all from Dressbarn, and gladiator sandal.  Coupons ladies, coupons!  You will save a lot of money and look great!
Oh, I forgot these, I picked up this Rain/Trench coat at Dressbarn and the yellow top with zipper detail. Paired the top with black and white patterned ankle pants, black blazer, black pumps and black and dark teal jewelry.


Wednesday, March 23, 2016

Vegan Chocolate Peanut Butter Cake

My new favorite chocolate vegan cake, just got an update, a new taste.  This cake is so versatile you can do anything you want with it.  It's one cake that I know my vegan son will eat, he loves it!  I know some will say, vegan eeewww!, but this is not the cake you will be saying that too, I promise.  Now, I used regular peanut butter on mine, but by all means try whatever you like, almond butter or cashew butter will work too.

Some ingredients to get this recipe started.
You don't even need a mixer, that is the best part, less cleanup.  This is my old standby for making sure it doesn't stick to the pan. 
Got the cake baked, let it cool, spread on the peanut butter, chill for an hour, then pour on the frosting.  This is so easy!
And D-E-L-I-S-H-I-O-U-S!
Chocolate Peanut Butter Cake
Ingredients for the cake
Bakers Joy or use canola oil and flour
2 1/4 cups of unbleached four
1 1/2 cups of white sugar
1/3 cup of unsweetened cocoa powder
1 1/2 teaspoons of baking soda
1/2 teaspoon of salt
1 1/2 cups of strong coffee, cooled or water (see note)
1/2 cup canola oil
41/2 teaspoons of white vinegar
2 teaspoons of vanilla extract
1 cup of peanut butter

Directions
Preheat oven to 350 degrees. Spray a 9 x 13 baking dish or pan with Baker's Joy, set aside. In a large mixing bowl combine flour, sugar, cocoa powder, baking soda and salt. Whisk together until all the lumps are gone. With a spatula or whisk, stir in the coffee, oil, vinegar, and vanilla. Scrape bowl from the bottom up to make sure everything is combined. Pour the batter into the baking dish/pan.

Bake for 30 minutes or until a cake tester inserted, comes out clean. Cool the cake for about 1/2 hour, then spread on peanut butter, refrigerate for 1 hour. While peanut butter is setting up on the cake, make the frosting.

Frosting
1/2 cup vegan butter ( Earths Balance is what I used)
1/3 cup almond milk with 1 teaspoon of lemon juice, stir together
1/4 cup cocoa powder, sifted
1 lb box confectioner's sugar, sifted
1 teaspoon vanilla

Place the sifted sugar in a large bowl and set aside. Combine butter, milk, and cocoa in a small saucepan. Cook over medium heat, while stirring, until the mixture just begins to boil. Remove from heat and pour into sifted confectioner's sugar. Beat until smooth, stir in the vanilla. After peanut butter has set, spread frosting to completely cover the peanut butter on the cake. Makes 12 servings.

NOTE: I use 1 cup of coffee and 1/2 cup of water. The coffee brings out the flavor of the chocolate, but the cake does not taste like coffee.


Tuesday, March 22, 2016

Happy, Happy Colors

Spring has sprung!  So I did a little discount shopping last week, with coupons of course, I don't leave home without them. Why pay full price when you don't have too is what I say! Today, having some girl time with a great friend, more discount shopping at our new Stein Mart, and then off to a nice lunch.  What a great way to spend a Spring day.

There are so many pretty colors for this season of Spring, and I can't wait to wear them all.  I was so excited about my finds, that I didn't pair them with anything, I just threw them on my form to show you.

I have been wanting a kimono since last year, well I finally found one at Dressbarn.  Floral Kimono was $25.00 got 20% off.
Love this pale coral/pink, long top with stitching detail and chiffon shirttail at TJMaxx for $19.99.
 I love yellow, it's so happy, sunny and bright.  Long, sleeveless top with zipper detail was $34.00, with 20% off $27.20.
 I don't have a lot of green in my wardrobe, so I thought why not, you have a Dressbarn coupon. Kelly Green Popover Top was $34.00, with 20% off $27.20.
And you can never go wrong with turquoise.  Long top with chiffon shirttail and zipper at detail at TJMaxx for $19.99.


Thursday, March 17, 2016

A Brisket, A Brisket!

Well, this is something I have never made before, beef brisket.  Why, you may ask?  Because I was always afraid it would be tough.  Brisket is not friendly if you don't know what you are doing.  You have to really season this cut of beef, and cook it for a long time so it tenderizes.  That is why I shied away from it.  Bound to the house all day is not fun for me, but it's been cold outside and I stay in when it's cold, so I gave it try. I cooked it in the slow cooker and it turned out fabulous!  Tender, juicy slices of pure deliciousness on a bun, that's all I'm sayin'.
Recipe below.
To print recipe, click on it, highlight and print.
To view photos in a larger format, click on them.
Eileen's Beef Brisket In The Slow Cooker

Ingredients
1 1/2 teaspoons chili powder
1/2 teaspoon salt
1/2 teaspoon pepper
1/2 teaspoon garlic powder
1/2 teaspoon onion powder
1 teaspoon sugar
2 lb beef brisket
1/2 cup beef stock

Directions
In a small bowl, combine chili powder, salt, pepper, garlic powder, onion powder and sugar, blend it altogether. Rub this mixture on both sides of the brisket.  Pour the beef stock in the bowl of a slow cooker. Lay the brisket on top, put the lid on and set it on high.  Cook the brisket for 6 -7 hours until fork tender. Turn the temperature down on the slow cooker to low.  Lift the brisket out, let it cool for 30 minutes, then slice it down.  Return to the juice in the slow cooker.  Heat through, serve on crusty rolls.   


Wednesday, March 16, 2016

Mahi Mahi, The Other Whitefish

Since I am usually cooking for two people nowadays, it gets a little tough finding food in proportions.  I don't like cutting steaks in half, or chicken breasts, you get the picture.  But, since I do a lot of food shopping at Trader Joe's, I started perusing their frozen section.  Now, I don't use a lot of things frozen, most of my cooking is fresh, when it comes to meat or fish.  So while looking through their fish section, they are reasonably priced by the way I just thought I would throw that out there for you, I saw packages of Mahi Mahi and thought I would given them a try.  Well I wasn't sorry, four nice pieces for less than $7.  There was a recipe for 2 different sauces right on the package, as well as lots of different ways to cook it.  You gotta love Trader Joe's, they do everything for you, and  in less than 7 minutes dinner is on the table, you can't beat that!  Check out Trader Joe's, lots of good things that are good for you in that grocery store.
Recipe below.
To print recipe click on it, highlight and print.
To view photos in a larger format, click on them.

Look at these beautiful cuts of Mahi Mahi, ready to sear in the pan.
Just right.....
     
 Now for the sauce - Butter, lemon, fresh parsley, salt and pepper.
     
Wow this has amazing flavor!
 
 So, I went a little overboard, everything for dinner was from Trader Joe's.  These vegetables are awesome.
 Oh, the whole grain rolls and sweet potatoes were too!  The rolls are a new favorite in the house.  
 How delicious does this look?
Mahi Mahi in Lemon Pepper Sauce

Ingredients
2 teaspoons Extra Virgin Olive Oil
4 fillets Mahi Mahi
1/2 of a stick butter (2 oz)
Zest from a lemon
Juice from lemon
2 tablespoons fresh chopped parsley
1/2 teaspoon salt
1/2 teaspoon black pepper

Directions
Heat olive oil in a frying pan over high heat.  Sprinkle fillets with 1/4 teaspoon each of the salt and pepper. Cook fish in pan for 3 minutes on each side.  In a medium microwaveable bowl, melt the butter with lemon zest, lemon juice, parsley and the remaining salt and pepper. Pour over the fish in the pan, simmer for a few minutes until the flavors meld together.  Makes 4 servings. 


Tuesday, March 15, 2016

We're Goin' Surfin'

Haven't had scallops in a very long time, the price of them has been up, so I don't buy!  While shopping I found some at a reasonable price, and surprised the hubby when he came home from work to a nice seafood dinner.  After all, he does work hard and pay the bills.

Rather than putting them in a pasta dish, I made the scallops with shrimp in a white wine butter, garlic and dill sauce.  YUM-O!  He loved them, but then again he loves everything I make, I'm a lucky girl I guess, or he just says that so he doesn't have to make reservations! Whatever....

Recipe below.
To print recipe click on it, highlight and print.
To view photos in a larger format, click on them.

Rinse the scallops and pat them dry on paper towels.
 Season with salt and pepper.  Over medium high heat add 1 tablespoon of extra virgin olive oil and 1 tablespoon of butter to a skillet until it melts.
 Add the scallops cook for a 1 1/2 minutes on each side, remove from pan. Drain some of the liquid off.  Return pan to the heat.
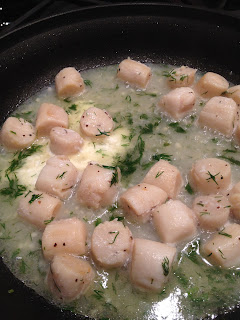
 Here comes the flavor!  White wine, garlic, butter, lemon and fresh dill.
 Mix a slurry of flour and water to thicken the sauce or you could use heavy cream.
I served the scallops and shrimp with roasted fresh french green beans and grape tomatoes, seasoned with olive oil, himilayan pink salt and pepper.
 
My other side dish, roasted purple and red potatoes with herb seasoning and olive oil.
So, this was dinner last night.  Tender, juicy, scallops and shrimp.  If I do say so myself, it was fabulous and looks pretty good too!
 I also served multi grain dinner rolls, trying to keep it healthy.
Sea Scallops and Shrimp In White Wine Lemon Sauce

Ingredients
2 tablespoon extra virgin olive oil
2 tablespoon butter
1 lb sea scallops
1 lb cooked, peeled, deveined shrimp
3 cloves minced garlic
Juice of 2 small lemons
1/2 cup white wine
2 tablespoons chopped fresh dill
salt and pepper
2 tablespoons flour mixed with 1/2 cup water (or use Wondra)

Directions
In a large skillet over high heat, heat 1 tablespoon each of the olive oil and butter.  Rinse the scallops and pat them dry. Rinse the shrimp and set aside.  Add the scallops to the hot pan and cook for 1 1/2 minutes on each side. Remove from pan.  If there is a lot of water from the scallops drain some of it off. Lower heat to medium.   Add the other tablespoon of olive oil and butter, saute garlic until fragrant, but do brown. Add the lemon juice, white wine (I usually remove from flame to do this, it's safer), chopped dill and salt and pepper. Cook for 15 minutes.  Whisk in the flour/water slurry to thicken the sauce.  Add the scallops back in along with the cooked shrimp and simmer until heated through, about 2 minutes.  Makes 4 servings.


Monday, March 14, 2016

Chocolate Chips Dressed Up

I bake once or twice a week, for my hubby who has a sweet tooth.  As soon as he is done dinner, he's like a little kid wanting dessert right away, so there is always something home baked in the house just for him.  I didn't want to make chocolate chip cookies, again, so I branched out, experimented and came up with a chocolate chip cookie pie.  Don't laugh, it was awesome, even I couldn't believe it! The bottom layer is chocolaty and gooey, so good.
Recipe below.
To print recipe click on it, highlight and print.
To view photos in a larger format, click on them.

 I took the easy way out and used a frozen pie crust, and some of the other ingredients I used. 
Measuring and getting ready to mix up the batter, butter and eggs at room temperature works best.
 Beat the eggs until light yellow in color and foamy, start adding the other ingredients. 
 Beat them together, add the butter.  Cutting it into cubes blends it better.
 The batter will be very thick.  Add the chips and nuts with a spatula when the batter is mixed completely.
 Spread evenly into the pie crust, smooth out the top and bake.  I recommend putting the filled pie crust on a baking sheet to avoid any bubbling over and messes.  And of course, it was all eaten before I got to take a photo of the baked pie.
 Chocolate Chip Cookie Pie
Ingredients
1 unbaked deep dish pie crust
2 extra large eggs, room temperature
1/2 cup unbleached flour
1/2 cup white sugar
1/2 cup light brown sugar
3/4 cup butter, room temperature
11/2 teaspoons vanilla
1 cup chocolate chips
1 cup chopped walnuts

Directions
Preheat oven to 325 degrees.  In a large bowl, beat eggs until foamy and light yellow.  Beat in flour, sugar and brown sugar.  Beat in butter until combined, add vanilla.  Stir in chocolate chips and walnuts, spread into pie shell, this mixture will be very thick.

Place the pie on a baking sheet and bake for 1 hour, or until a cake tester when inserted in the center comes out clean and the pie is set. You may have to cover the crust edges with foil if they start to brown too much. When pie is done remove from oven and cool on a wire rack.

This pie is best served when warm.  It can be slightly reheated if necessary.  Serve with Ice cream, chocolate sauce or whipped cream.