Monday, July 16, 2018

Grilled Salmon with Lemon Butter Sauce

It's Summertime,YAHOO!  And that means every meal we eat goes on my grill.  Keeping the house cool is the goal, I don't like high power bills they make me sad.  So the easiest way to cut the air conditioner from running is to keep all the heat outside. I cook breakfast, lunch and dinner out there, and it doesn't matter what is on the menu, I adapt all of it to the grill.

This past week I made my Salmon with Lemon Butter Sauce.  Pulled out my grilling basket, placed two nice sized pieces of  salmon for the hubby and I into it, and on to the grill it went.  In a slight 8-10 minutes my whole meal was done, it was easy and delicious.

I purchase a lot of my salmon from either Costco or Trader Joe's.  Costco offers larger pieces that I cut and divide into freezer storage bags, and Trader Joe's offers smaller pieces that are already frozen.  I am picky though, I do not like skin on my salmon, it grosses me out, and I can buy skinless pieces of salmon at both stores. Check it out, this how I made it.

I would not recommend putting salmon on the grate on your grill.  It has to go in a basket like the one I have shown, some kind of grill pan or make foil packets.  In a bowl, I melted 1/2 stick of butter, 1/4 teaspoon of Pink Sea Salt, 1/4 teaspoon of Cracked Black Pepper and juice from 1/2 of a lemon.  Slice the other half of the lemon for lemon slices to garnish the salmon.  Place the the salmon pieces in the basket on top of the grill, close and secure the basket.  Grill on each side 3-4 minutes, depending on the size of your pieces, or until the fish is flaky but moist.
I served my salmon with Roasted Herb Potato packets done on the grill, a small side salad always present in the summer with my dinners, and fresh homemade Raspberry Iced Tea.


Tuesday, July 10, 2018

DIY - The Bird Feeder

We have a BIG problem with wild animals in our area, and it's funny because we are about 1 block from one of the busiest main arteries for traffic.  All this wild life is crazy! We have deer by the herds, raccoons, foxes, opossum, groundhogs, squirrels, vultures, occasionally wild turkeys, all kinds of birds, have had a blue heron fly into my yard, turtles, frogs and now something new that makes sounds like I have never heard before, don't know what it is, but it's pretty scary.

We both love watching the birds, and used to put a lot of bird feeders out, then we stopped.  The deer, raccoons, squirrels and lord knows what else is lurking out there, would eat all the seed before the birds could get to it.  The animals would knock the bird feeders down or drag them into the woods and eat everything.  So the hubby and I decided to build, hopefully an animal proof, bird feeder.  So far, so good, it's been hanging for about 2 months now and nothing has gotten to it.

We decided it had to be 10 feet or taller, because a deer when it stands on its hind legs is about 10 feet high or taller.
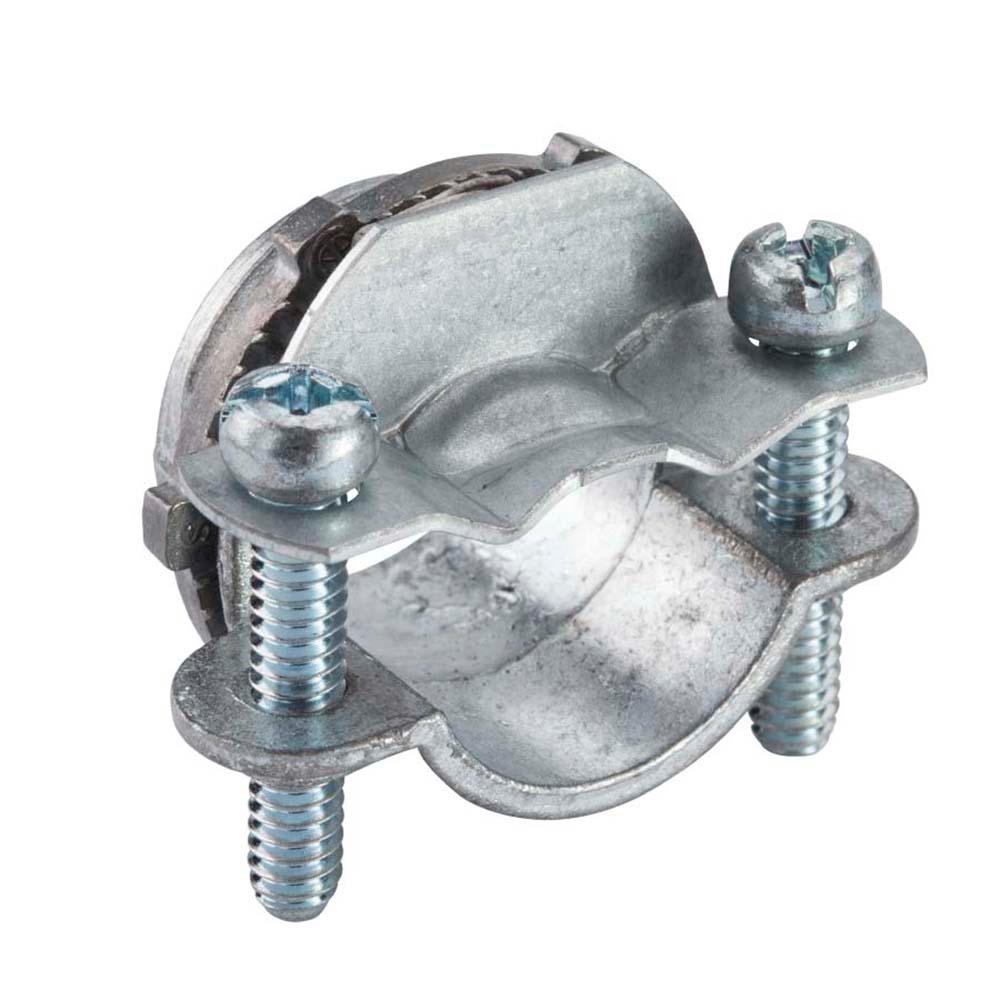
To make the feeder pole, we purchased a 10 ft  4"x 4" treated deck post, a 6 ft 2" x "4 treated piece of wood, a 4" x 3" block of wood, wood screws, 2 pulleys, a dock cleat, a metal eye snap hook to hang bird feeder, 2 cable clamp connectors, vinyl coated cable wire and an in ground easy spike.

How we made it:
Saw the 2 x 4 in half and attach to either side of the deck post at a 45 degree angle (for added height). Secure the smaller 4" x 3" block of wood between the angled pieces of wood.
Attach one pulley to the top of the 10 foot post and the other pulley to the small piece of wood between the angled wood.  Make a loop at the end of the cable wire, and use the clamp connectors to secure and tighten the loop, so it stays in place to hold the hook for the bird feeder.  Thread the cable wire over the pulley on the angled pieces of wood and down and over the pulley on the big post.
Attach the dock cleat on the back of the 10 ft post. Attach the hook for the bird feeder to the cable wire where you made the loop.
Small block of wood between the angled pieces of wood.  This is what clamp connectors are.
                  
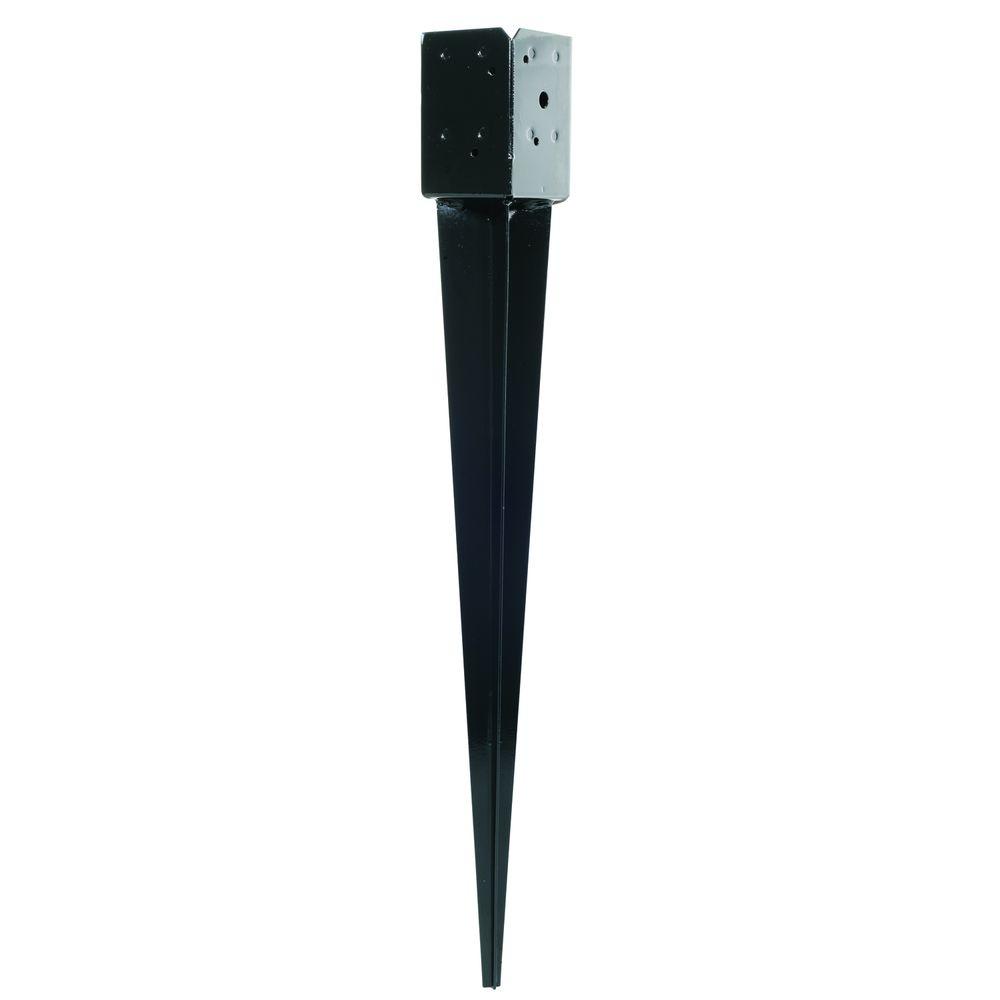
In ground easy spike post holder.  Just hammer into the ground, place post inside and secure with nuts and bolts. CAUTION:  This spike is big so make sure there are no underground pipes or cables wherever you put this!
12-Gauge Black Powder-Coated E-Z Spike
Post is secured in the easy spike post holder secured with nuts and bolts.
Dock cleat hook and vinyl coated cable wire.
Last, attach your filled bird feeder to the hook, pull on the cable wire to the top.  Tightly wind the cable wire around the cleat, and secure in place to hold the feeder up on the top.  You can paint the wood if its dry before you hang your feeder.  My wood was still wet, so I haven't painted it yet. 
ENJOY WATCHING YOUR FEATHERED FRIENDS!


Thursday, May 31, 2018

Party in a Pineapple!

I buy a pineapple(s) every week for about $2.50 each, sometimes they are less than that. That's pretty inexpensive for something that tastes so good and has traveled pretty far to get to my local supermarket. Think about that and the price of gas right now, hmmmmmm..... My pineapple will last longer than the gas too! I also buy pure pineapple juice to drink and for cooking and baking.
Not only are pineapples great tasting, they are good for you.   Pineapples are an amazing fruit. They are rich in manganese and vitamin C, the juice is great for drinking, and is also good to use as a marinade and tenderizer for meat. Outside of culinary use, the pineapple is a symbol of hospitality around the world when displayed. Check out my Party in a Pineapple dish that I made for dinner the other night, it was delicious!
Recipe below.
To print recipe, click on it, highlight and print.
To view photos in a larger format, click on them.

I jazzed up my pineapple for dinner the other night and made a "fancy" dinner for the hubby and I.  I cut the pineapple down the middle and cut the fruit and core out of it. It wasn't really "fancy" to prepare, because I used shortcuts for the whole meal.
But as you can see the presentation was beautiful and eye appealing, and the taste was all there.  It was so good he was looking for seconds, but there weren't any and I didn't share mine either!
Teriyaki Chicken in a Pineapple for Two
Ingredients
1 whole fresh pineapple
1 - 10 oz. bag microwaveable white rice
2 teaspoons oil
1/2 red bell pepper, cut into 1 inch pieces
1/2 green bell pepper, cut into 1 inch pieces
1/4 sweet onion, diced
1 -  25 oz bag frozen crispy chicken tenders
1/2 cup Veri Veri Teriyaki sauce
1 teaspoon sesame seeds

Directions
Slice pineapple from top to bottom so you have two boats.  Cut all around the edge of the pineapple without going through the skin.  Leave the skin intact.  Cut flesh down both sides of core.  Score the flesh in 1 inch pieces and scoop them out into a bowl.  Cut out the core and discard.  Set pineapple boats aside and cover them.  Take out 6 larger pieces of chicken tenders from the bag.  Cook according to package directions. While the chicken is cooking in the oven, in a large frying pan heat the oil over medium-high heat.  Saute the peppers and onions just until tender, remove from heat. Cook the rice in the microwave according to package directions.  When chicken is done, cut into bite size pieces.  Over medium heat, add the chicken, pineapple and sauce to the peppers and onions in the frying pan. Heat through until hot and all is coated evenly.  Divide chicken and rice between the two boats and top with sesame seeds. 


Wednesday, May 23, 2018

No Skimp Shrimp Tacos

 Got my creative juices flowing again, thinking of different dishes to make for dinner. I get tired of the same old thing all the time.  Summer is almost here, so I am starting to plan new things to cook outside on the grill.

Cooking outside is one of my favorite things to do.  No messes inside, no hot kitchen, very little cleanup, everything tastes better on the grill, and weather permitting we always eat outside on the deck. It's the best!  I put together these Shrimp Tacos with Pineapple-Mango Salsa the other day, unfortunately it rained outside so I had to cook them inside.  They were very tasty, the hubby gave a thumbs up, that means I will be making them again, hopefully outside!
Recipe Below.
To print recipe, click on it, highlight and print.
To view photos in a larger format, click on them.

To make my salsa I used fresh pineapple, mango, red pepper, onion, lime zest and fresh cilantro.  Everything tastes better when it's fresh.  I always try to use fresh, and now is the season for it.  There is an abundance of fruits and vegetables out there to try, explore them and the possibilities of new dishes to use them in. 
 The colors are so appetizing, looks pretty too!
 Mix a little honey and lime juice into it. If you want the salsa spicy, add a minced jalapeno.
 I used raw, peeled, deveined shrimp tossed with taco seasoning and extra cumin for added smokiness. 
 Toss those tortillas on an open flame to warm them up and blacken them a little, just a little for color.
 Stuff them with the shrimp, top with salsa....
.........and drizzle a little Lime Crema and serve.  Awesome and tasty!
TASTY SHRIMP TACO'S

Ingredients
2 limes zested and juiced, set aside

For the Salsa:
1 diced ripe mango
1/2 fresh pineapple, remove core and dice
1/2 diced red pepper
1/4 cup diced sweet or red onion
1/3 cup cilantro, chopped
2 tablespoons honey
2 teaspoons lime juice
1 teaspoon lime zest
1 diced Jalapeno Pepper, optional

For The Crema
1/3 cup sour cream
3 tablespoons mayonnaise
1/4 teaspoon salt
1/2 teaspoon lime juice
1 teaspoon lime zest

For the Shrimp
1 1/2 lbs peeled, deveined salad shrimp (tiny shrimp)
1 tablespoon of canola oil
1 packet of taco season
1/2 teaspoon cumin
1 tablespoon lime juice


Directions
In a medium bowl, toss diced mango, pineapple, red pepper, onion, cilantro, honey, lime juice and lime zest.  Refrigerate until ready to use.

In a small bowl mix the sour cream, mayonnaise, salt, lime juice and lime zest.  Place the mix in a resealable plastic bag.  Refrigerate until ready to use.

Rinse shrimp under cold water and drain.  Heat canola oil in a frying pan over medium high heat.  Add drained shrimp to the pan, taco seasoning, cumin and lime juice.  Cook until shrimp are pink, remove from heat.

Over open burner flame, hold tortillas over the flame for a few seconds on each side to brown/blacken them up a little.

Fill tortillas with shrimp.  Stir the salsa up and top each tortilla of shrimp with salsa.  Knead crema bag, snip off a corner of the bag and drizzle on top of each tortilla and serve.  Makes 4-6 tacos.


Thursday, May 17, 2018

Lotsa Pasta!

I did it, I finally did it! I was going to try and get an electric motor, for my hand cranked pasta machine, but mine was an older version from Italy and the motor would not fit on it. That little problem would require me to buy a newer version hand cranked machine (silly) as well as the motor, which would have cost about $200.  And, I still would only be able to make 3 types of pasta noodles without buying extra attachments, that of course cost more money. 

I tossed and turned with my decision to purchase a newfangled, total electric pasta maker/machine, and I have to tell you, I should have done it sooner!  No fuss, no mess, the machine does EVERYTHING for you. It weighs, mixes and extrudes the pasta all in about 15 minutes! All you have to do is cook it and enjoy eating it, it's A-M-A-Z-I-N-G! No more sore arms and hands from kneading dough or long hours of cranking out homemade pasta for this girl.

This is the old hand cranked machine, I'm still keeping it just in case I get nostalgic.
This is the new electric machine, I love it! I am so happy about this purchase because we eat a lot of pasta in this house.
 This is the dough hopper. Pour flour in, it weighs it and then tells you how much liquid to add.
 The machine came with 8 different pasta shapes to make pappardelle, spaghetti, thick spaghetti, angel hair, fettuccine, tagliatelle, penne and lasagna. It came with lids that fit over some of the presses to clean them.
 The machine also came with a recipe book, measuring cups for liquid and flour, two other cleaning tools and a pasta dough cutter.
I used a combination of semolina flour and unbleached white flour for my pasta. I didn't use eggs in my dough, just water and flour.  You certainly can use eggs as most recipes do call for them.The machine will work the same with eggless pasta dough.
 Drying on the pasta rack.  My daughter and I made about 2 lbs of fresh pasta. You don't have to dry the pasta, we just made this earlier in the day and decided to dry it.  You can toss it right into the boiling salted water as soon as you make it.
 Ahhhhh.....and the homemade sauce with San Marzano tomatoes and sweet Italian sausage
 is the best.
 Pasta cooked and sauced up, don't forget the cheese, it's always better with cheese.
WOW that was soooo good!


Tuesday, May 15, 2018

Eat a Fajita

This house likes Mexican food, a lot.  I make Mexican meals about two or three times a month, and I always try to find new ways to make it.  When I make my fajitas I usually use a seasoned skirt steak, grill it on the grill outside, and then thinly slice it and serve on tortillas. This time, I made them with leftover Filet Mignon that I had.  I tossed the thinly sliced meat with a little olive oil and fajita seasoning, along with peppers and sweet onion.  They turned out really good and because of the meat they were so tender.  

Making easy, fast meals is one of my favorites in the summer.  Summer is the time to relax without making food complicated and being stuck in the kitchen.  I like to relax after a meal and not have a kitchen and pots and pans to clean up. So this meal was given an A+ for taste, time and cleanup, because its done outside. 

I seasoned 1/2 red pepper, 1/2 yellow pepper, one sweet onion  and leftover Filet Mignon, with one packet of fajita seasoning and 2 tablespoons of olive oil.  All are ready to go on the grill.
Grill peppers and onions until somewhat caramelized and meat is heated through.  When they are almost ready, grab those tortillas and grill them up a little on the grill.  All done and ready to eat!
 
Stuff them and eat with a dollop of sour cream.
Awesome!


Sunday, May 13, 2018

Jaxson's Outdoor Adventure Nursery

So Jaxson arrived in April, but before he came into the world, there was so much to do.  I called dibs on his nursery when I first found out his mommy and daddy were pregnant, wanted that job so bad!  I immediately started searching for decor, his room needed to be perfect for him.  He is definitely the sweetest boy and deserves all we could ever give him -  love, time, attention, holding him, caring for him and the world of course! 

Having a first grandchild is like no other, he will always be the first. He stole out hearts the moment his grandpop and I set eyes on him, another little someone to carry on the family name. He certainly brought life back into our "almost empty nesters" home.  I can't wait until he is running around the backyard, looking for frogs and turtles in the creek and catching lightning bugs like his daddy used to do. 

This is his nursery, all complete and waiting for him when he came home.  His mommy took him in his room and said he was looking all around, I think he liked it! The room is full of bears, foxes, tee pees, arrows, canoes, trees and adventure.
To view photos in a larger format, click on them.

This is the wall color his mommy picked out, it's called SPA by Behr Paint.  It was pulled from one of the colors in the linens for the room.
All his furniture, except the rocker which was a shower gift, came from COSTCO. This is the changing table, nice and big with lots of storage. The bureau came with the changing table top and the changing pad. The tee pee and arrow were purchased at Hobby Lobby, bear head from Target and Explore sign from Marshall's. Gray felt storage containers were purchased at IKEA.
The beautiful rocker matched all the other furniture perfectly. The tee pee clothes hooks are from Hobby Lobby. The pillow is from The Christmas Tree Shop and the blanket from SteinMart, have to keep Jaxson cozy! 
I love everything in his room, but my favorite is this bookshelf from Babyletto, shaped like a tree to go with the theme of Outdoor Adventure.  Seek Adventure picture is from Target and the Canoe is from Hobby Lobby.
Some of Nonna's favorite books, more will come to fill up all the branches.
 
Arrow print curtains and coordinating valances are from Sweet JoJo Outdoor Adventure pattern, all from Target (online only).
A chiffarobe with drawers, shelves and a clothes bar. Fox lamp, bear nightlight and felt fox storage basket are all from Target.  Be Brave wood plaque from Hobby Lobby.
 His crib, love it!  I did make one mistake though, I purchased rail guards for front, sides and back.  You can not attach one to the back of this type of crib.  Tee Pee wall shelf is from Hobby Lobby.  Quilted wall hangings were included in the Sweet JoJo linen set. The set also included a comforter, sheet, bolster pillow, crib skirt, diaper stacker, toy bag (under the tee pee shelf) and the window valances.  This crib also came with the rails to convert to a youth bed, day bed and a full side bed when he gets older.
 Remember the letters from those diaper boxes from his mommy's shower?  This is the wall over his crib before I hung them........
This is the wall after I hung them, along with "I love you to the moon and back".   His Nonna surely does!
For Jaxson......
Be a little boy for as long as you can, play outside, play in dirt, jump in puddles, catch lightning bugs, catch frogs and turtles, build a fort, read lots of books, run around barefoot, try new things, learn to ride a bike, learn to swim, climb the Bagheera tree, go sledding in the snow, dream big, go on adventures, be kind, be smart.
 I LOVE YOU SWEET BOY!
                                     Nonna