Tuesday, June 30, 2015

A Little Bit Of Dirt And A Lotta Love!

Way back in May I started my vegetable garden, my son rototilled a patch of soil for me to get it started.  I love having fresh vegetables in the Summer, and planting and growing your own beats paying for them.   I can go right out to my patch, pick what I need right from the vine, pesticide free.  It keeps me busy though, caring for it, watering, keeping groundhogs and deer out of it, it's like a smorgasbord for them.  I'm sure they share the news with all their animal friends that WE have a garden and it's free eats for all of those who hang out in the woods!  So far so good, they haven't touched it, but things aren't ripe yet, so we'll see how it goes.

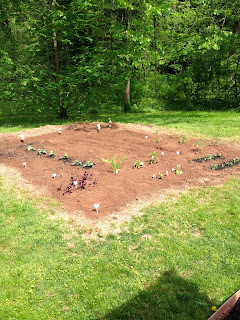
This is the size of my patch on May 3rd.....
Veggies getting started on May 8th.....
Growing fast, so I staked everything on May 23rd......
And BOOM BABY, a month later on June 23rd!  Look at the size of everything.  What I have producing already, 5 kinds of tomatoes, peppers, zucchini, yellow squash, eggplant, kale, 3 different kinds of beans and fennel.  These veggies will come in later, corn, beets, cucumbers, peas, carrots and onions.  It looks great and can't wait to start picking and eating from the vine.


Monday, June 29, 2015

The Black And Whites - Loving Old Photos

There is something about old black and white photos that I love.  Times gone by, even before I was ever thought of.  When I look at these old photos,  I can see what  my mother, aunts and other relatives looked like when they were young, they were vibrant and having fun.  I can see my ancestry, where my looks came from and mannerisms. It's sad that they are all gone now, but having these photos out and displayed reminds me of them day to day.  

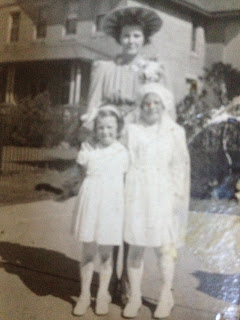
This photo, I'm guessing is from the late 1930's.  The reason I know this is because my mother was born in 1933 and she is only about 6 or 7 in this picture.  My mother is front and center, my aunt (her sister) is on the right.  My grandmother is in the back on the left.  My Aunt Edie (left) and Aunt Helen (right next to Aunt Edie) were my grandfather's sisters.  Aunt Edie later became a Missionary Sister of the Sacred Heart.  She was a tiny person who only stood about 4 feet 10 inches and was full of fun.  The other sister I do not know, but I am sure she was fun hanging around this group of ladies!
Left:  My grandmother, my mother on the right and my Aunt on the left.  I'm sure it was my mother's First Holy Communion day.
Right: My Aunt's First Holy Communion and May procession.
Left: My aunt and my grandmother.
Right: All grown up, my aunt on the left and my mother on the right.
My mother and father on their wedding day.
 
My sister and her favorite doll, she carried it everywhere!  My sister had the most beautiful, thick, black hair when she was little.

Big baggy sailor outfit, and yes that's me, dressed to the nines, I still love clothes and fashion today!  I even had my gloves inside the bag, because I was all dressed up and had places to go.


Sunday, June 28, 2015

The Next Time You Complain About The Heat.....

Would you rather have this.........
Or enjoy the outdoors.  Suck it up buttercup, you can always get cool indoors.
I like to be outside, where the weather is warm and sunny, than be couped up inside for months at a time.
Even if it's just on my deck listening to the birds, watching the deer and all the other wildlife around me, peaceful quiet times in the Summer, oh yeah!


Monday, June 22, 2015

I'm Giving You The Raspberries

What can I say about Summer fruit, it's the best.  It has the most wonderful flavor in the world. Sweet, juicy and there are so many things you can do with it.  Pies, jams, grill it, make a cake, frozen pops or salsas, I could go on and on of all the things you can do with Summer fruit.  I found some interesting berries that I have never seen before, yellow raspberries, and thought I would give them a try.  The color was vibrant, pretty, that's what drew my eye to them. I love color, as you all know, it keeps things interesting.

I made a fruit and lettuce salad with all my berries, if you have never tried this, please do, it's tastes great! I washed romaine lettuce and berries, (you can use any lettuces you want, a Spring mix and super lettuces like kale, chard and spinach are good too).  Chop the lettuce, slice the strawberries and then toss with blueberries, blackberries, red raspberries and yellow raspberries.
 Look how colorful! I also used matchstick carrots and cucumber.  It's all good for you food.  I made my favorite sweet/ tangy dressing for this salad - 1/4 cup apple cider vinegar, 1/4 cup red wine vinegar, 1/2 cup canola oil, 1/4 cup sugar (or other sweetener, agave or honey) 1/4 teaspoon paprika, 1 teaspoon sesame seeds and 1/4 teaspoon poppy seeds.  Shake it all together, drizzle some over the salad.


Wednesday, June 17, 2015

Pizza Express

We are big pizza eaters in my house, at least once a week we have pizza on the menu.  Everyone loves it and its satisfying, served with a salad it makes a nice meal.  I tried a new way of making pizza last night, I usually make my own dough and homemade pizza sauce, but I came up with a new express way of making pizza on the grill, and I have to tell you it was fantastic.  Taste just like a brick oven pizza, without the cost or giving up any of the flavor.  It was a hit with the family, they are my biggest critics, and if it passed them I know I will be making it again.

I used Brooklyn Bred Pizza Crusts.  BJ's as well as Costco sells these.  I also use them for pesto bread which is awesome!  Heat your grill and put them on to crisp up for about 5 minutes on each side.  Be careful and watch them so they don't burn, all grills are different.
My nice friend turned me on to this pizza sauce, it's the best and tastes great! After the crusts crisp up to your liking, add sauce......
A little fresh basil from the garden doesn't hurt.....
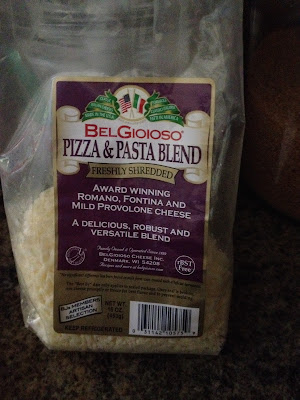
And this cheese blend I found at  BJ's, it's great and adds alot of different flavor to my pizzas.
And heeerrrre they are!  If the bottoms of your pizzas get too brown, turn the grill off and set the pizzas to the side, close the lid so the cheese melts.
My pizzas are all done and they look fabulous!
 I cut them across, you can get 5 - 6 slices from each crust, depending how big you cut them.
 Crispy crust on the bottom, just like brick oven pizza!  


Tuesday, June 16, 2015

Handy Woman At Work

I needed to replace the grout in my Master Bath stall shower, it was really dirty as you can see, I shouldn't have let it go this long.  I've tiled before, but never had to dig grout out. I was a little nervous about doing this, but it had to be done.  It took me about 2 hours to do this project, not too long, and it looks somewhat professional, I hope!

Here is the nasty old grout that I dug out between the wall and the floor, I know, gross right?  I did not remove the grout between the floor tiles, it wasn't bad, I just refilled them.   
 It didn't take too long to remove the old grout with my handy tool.
 Tools I used - My all-in-one, double ended, grout removing and smoothing tool - the orange one (the red tool is also a smoothing tool), a flat rubber grout float, small trowel and pre-mixed grout.  You will also need a bucket of clean water and a big sponge to wipe up excess grout.
I used pre-mixed grout, Home Depot carried the exact color I needed, and it's easier than mixing it yourself and less messy.  It comes in a quart container and the cost was $10.47, all the other tools I had from previous projects.
Make sure your shower is totally clean, free of any dust from removing the old grout, and it must be completely dried out.  We didn't use ours for a couple of days prior to this project.  Plop some of the grout down in a small area, with the trowel, and press it along the wall where the tile meets the floor with the grout float.  Keep pressing it in until all the cracks are full. Then start pulling it towards you to get in between the floor tiles.  Use the smoothing tool to smooth out any rough areas between the wall and the floor.  Wipe off excess with a damp sponge.
 This is the smoothing end of my grouting tool, to make all my edges perfect, so they look professional. I'm not a professional, but I'm cheaper than one, so it has to look good!
 The shower is done, all the nooks and crannies are full of fresh, clean grout.  I don't think I did a bad job, you know, because I'm not a professional.  But I did it, and if I get a few years out of it, it was worth the $10.47 I spent.  Don't be afraid to tackle tough jobs, BE SURE to read directions on products (the shower will take 7 days to dry!), do your research before you start, shop the stores, and find ways to make them easier on YOU!
I also used this product to seal the grout after it dried, it is very east to use.  All you do is aim and spray on the grout, leaves no shine, also protects against stains. Read all directions before spraying.






Monday, June 15, 2015

Oh, My My, Tomatoes!

My tomato plants are finally producing tomatoes, and I can't wait to pick them.  There is nothing like a fresh tomato that you grew from your very own garden.  I remember growing up, my grandparents grew all kinds of vegetables in their garden, and we would pick fresh tomatoes right from the plant, sprinkle with a little salt and bite right into it, ahhh those were the days.  In my garden I planted beefsteak, big boy, plum, grape and yellow grape tomato plants this year, and I hope I get a bumper crop.  I will need them, since one of the big box stores I go to stopped selling my favorite bruschetta.  Now I have to make my own, so having all the tomatoes will help, I won't have to buy them,  I had to purchase some yesterday, my tomatoes are still green but growing, to make homemade bruschetta.  I could eat this stuff everyday for lunch it's so good!  Recipe below.
To print recipe, click on it, highlight and print.

I started with a box of plum/Roma tomatoes, they are the best I think, very meaty.  Fresh basil and parsley from my garden and a few other ingredients.
 I like using red onion because it gives the bruschetta pretty color.
 My plums or Roma tomatoes as they are called.
 I scoop the seeds with a teaspoon.
 Slice them down and then dice them, so they look like this.
Toss all the ingredients in a bowl.
 Scoop it on top of crostini and it's a meal for me.  If there are any leftovers, I store it in a canning jar.
 Homemade Tomato Bruschetta

Ingredients
12 plum/Roma tomatoes
4 cloves garlic, minced
1/2 red onion, minced
10 basil leaves, cut chiffonade style (roll leaves up and slice)
1 tablespoon fresh chopped Italian flat leaf parsley
1/4 cup extra virgin olive oil
2 tablespoons balsamic vinegar
2 teaspoons kosher salt
1/2 teaspoon black pepper

Directions
Slice all the tomatoes in half, then scoop the seeds with a teaspoon and discard them.  Slice the tomatoes lengthwise then dice them. Toss the tomatoes into a medium size bowl, with the remaining ingredients and mix together.  Store in a covered container.  Makes about 2 1/2 cups.