Tuesday, December 31, 2013

Light and Easy Taco Salad

When there are just a few of us at home for dinner, I don't like to make full course meals, it's a waste of food and time to make all that food and for no one to eat it.  So, I try to make meals that are hot, easy and that I know everyone will eat and there will be no leftovers. Taco's is one of those meals, everyone likes them, and everyone in my house will eat them in one way or another.  I make these a little bit lighter, using less fat ground meat, I make mine into a salad and use the taco sauce as the dressing.  This is how I make them:

On medium high heat in a frying pan, add 2 lbs lean ground meat.  Fry it up until all the pink is gone.
 After it's cooked and the pink is gone, I drain it in a colander to remove any fat off the meat.  Wipe the pan with clean paper towels. Pour the meat back into the pan and add 1 envelope of McCormick Taco Seasoning.
 Sprinkle it all over the top and stir it in while you are cooking it, until all of the meat is covered.
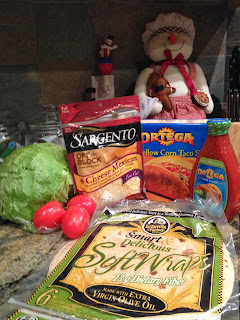
 The meat is cooked, now turn the burner to low and cover.  Chop up tomatoes, I use plum because they are meatier and less watery, iceburg lettuce and sweet onion.  I buy bagged shredded Mexican mixed cheese (it's easier than grating your self), taco shells, taco sauce and flour tortillas.  We love the La Tortilla Soft Wraps, low in calorie and they taste good!  They also come in a variety of flavors.
Everything is ready to build my salad and tacos.
 I like crunch when I eat, it makes me feel like I'm eating, call me crazy! So I either use tortilla chips, or I break up taco shells on my plate.  Next I start building with my meat
 Then the cheese on the warm meat so it melts, then the lettuce
tomatoes and onion, pour taco sauce over the top and a dollop of sour cream.  I didn't use low fat, light or low salt in this recipe, but I do make them that way.  You can purchase the seasoning in low salt, the sour cream in a light version and the cheese also comes light or low fat.  Whether they eat them as a salad, on a taco shell or on a warm tortilla, tacos are always a hit in my house!




Monday, December 30, 2013

Antipasto di Pizza Dip

I made a few things to eat for Christmas Eve at my daughters house.  She asked for a little help because she had over 20 people coming.  I made a cake for dessert and one of the many appetizers she needed to start off the meal.  I didn't want to make the same old thing, so I came up with this Pizza Dip.  It's fast easy and travels well in the car.  I only had to microwave it for a few minutes, she lives far, it was snowing outside, so it wasn't as warm as it should have been, to be served.  I toasted a baguette to serve with it, much cheaper than buying them already package and toasted.  I have no picture of the dip because everyone swarmed down on it and it was gone before I could snap one!  Recipe below.

Pizza Dip

6 oz. Philadelphia Brand Cream Cheese, at room temperature
1/2 cup of Daisy Light Sour Cream
1/2 cup Hellmann's Light Mayonnaise
1/2 cup of grated Parmesan Cheese
1 - 8 oz. bag of shredded Sargento Mozzarella Cheese
1/2 teaspoon garlic powder
1/8 teaspoon each of salt and pepper
1 teaspoon oregano
pinch of crushed red pepper flakes
1 1/2 cups of jarred pizza sauce, I make my own so I use that, but jarred sauce is fine
1 cup of chopped pepperoni
1/2 green bell pepper, diced
1/4 cup of sliced black olives, optional
1 baguette, thinly sliced and toasted, or packaged crostini 

Preheat oven to 350 degrees.  Mix the cream cheese, sour cream, mayonnaise, 1/4 cup of the Parmesan cheese, 1 cup of the Mozzarella cheese, garlic powder, salt, pepper, oregano and crushed red pepper flakes together in a bowl.  Transfer it to an ungreased pie plate, and spread it evenly across the bottom of the plate. Spread the pizza sauce on top of the cheese mixture, then layer the remaining Parmesan and Mozzarella cheeses.  Top with the chopped pepperoni, green bell pepper, and olives.  Garnish with a few whole pieces of pepperoni and sprinkle with a little oregano.

Bake in the oven until the sides are bubbling and the cheese is melted and golden brown, about 20 -25 minutes.  Serve with thinly sliced toasted baguette slices.

NOTE:  To make baguette slices you need one long baguette, sliced thin on the diagonal, place on a baking sheet sprayed with cooking spray.  Bake at 375 for 15 minutes or until browned on both sides. 


Sunday, December 29, 2013

Christmas Dinner Table Scape

I hope you all had wonderful holidays filled with love, family and friends.  Our Christmas Eve was spent with my daughter and her boyfriend at their home, with lots of great food, family and friends.  Christmas day was celebrated at our home surrounded by our family, and again with great food.  We started the day off with a big breakfast, and as tradition follows, it was appetizer time.  They all look forward to the appetizers and pick all day until dinner.  As the day progressed, everyone played catch up and got intenseley involved with board games.  I served a fantastic dinner of Prime Rib with Bearnaise Sauce, Sauteed Portobello Mushrooms, Au Gratin Potatoes, Roasted Green Beans and warm rolls.  I also made a Ham Glazed with Pineapple, Brown Sugar, Orange Juice and Ginger Ale (the way my mom use to make it).  Next up, Dessert - Homemade Vanilla Bean Cake with Chocolate Butter Cream Frosting, Lemon Meringue Pie and Brownies with Vanilla Ice Cream, and not to forget, all the homemade cookies and candies. Our house is an all day food fest!  Stuffed, yes we were, and if anyone went home hungry it was their own fault!

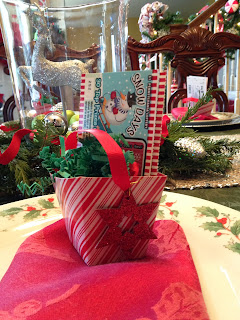
I spruced up my table scape (from the cookie party) and switched out a few things.  I set it with a pine green tablecloth, burlap and silver runner, red and silver chargers, Christmas china, red velvet ribbon, red napkins and party favors that I made up.  The party favors were little red and white striped boxes, tied with Joy, Noel and Star glitters tags, stuffed with green shred and 2 instant lottery tickets, so everyone had a little (non- food) treat when they sat down. And yes, we did have a few winners on those tickets!


Saturday, December 28, 2013

The Fungus Among Us!

I live not far from the big mushroom growing capital of the world.  I make alot of mushroom dishes, and portobello mushrooms are my favorite.  They are much more meatier than white mushrooms and have a thicker texture to them.  I saute them with olive oil, butter and garlic as a side dish for steak, use them for Chicken Marsala, love them on a pizza, and they are great stuffed with anything for an appetizer.  I made my own version, of a Crab Stuffed Portobello Mushrooms for an appetizer on Christmas Day.  Recipe below (it's party size, so you will have to adjust for smaller portions).

I wash my mushrooms under the sprayer from the sink.  I don't believe just wiping them off cleans them!  I throw them all in a colander and spray them to get off all the dirt.  Next, I pull off the stems and using a teaspoon, gently clean out any remaining stems and the gills from under the caps.
 When they are all cleaned they should look like this.  Line them up on a baking sheet.
Crab is mixed, then I fill mine up ALOT!
And here they are all crabby, cheesy and delicious. They are like a meal all in themselves.
Crab Stuffed Mushrooms

1 large container of portobello mushrooms (I get mine from Costco I think it's a 2 lb container)
1 - 16 oz container of lump crab meat (also from Costco)
1/4 of a large onion, minced
2 teaspoons of fresh thyme, chopped
1 teaspoon of oregano
1/2 teaspoon Cracked Black Pepper
1/2 cup of mayonnaise
3/4  cup of grated Parmesan cheese, (set 1/4 cup aside for garnish)
1 1/2 cups of  grated White Cheddar Cheese (set the 1/2 cup aside for garnish)
Paprika, for garnish

Preheat oven to 350 degrees.  Wash the mushrooms in a large colander.  Remove all the stems, and with a teaspoon, gently remove all the gills under the caps.  Mushrooms are delicate so be careful not to break them apart.  Line the mushrooms up on a baking sheet.  Set aside.

In a large bowl, stir the crab, onion, thyme, oregano and pepper until combined.   Add the mayo, 1/2 cup of Parmesan cheese and 1 cup of white cheddar cheese, and mix altogether.  Using a tablespoon scoop the crab mixture into the mushroom caps.  When all are filled, mix together the 1/4 cup of Parmesan and the 1/2 cup of white cheddar that are reserved.  Sprinkle the cheese mixture on top of the caps and garnish with paprika.  Bake for 30 minutes until the cheese is golden brown.  Serve immediately.  Store any leftovers in the refrigerator.

Friday, December 27, 2013

Christmas Morning Baked French Toast

Christmas morning has always been a joy for me.  When our kids were little, we were slowly woken up by them on Christmas morning, to see what Santa brought.   It was so much fun to see how happy they were, and the expressions on their faces.  They would come into our room and whisper " mom, dad, can we go downstairs and see what Santa brought?" They would never just go downstairs, they would always wait for us to get our sleepy heads out of bed.  First up on the agenda that morning, was everybody got a glass of orange juice to wake us all up.  Then after the gift opening, it was my turn in the kitchen.  It was the BIG Christmas breakfast on Christmas morning.

  I am sad to say that those days of little voices whispering in our ears are over, the kids are all grown, and now I am the one whispering in the morning, so I don't wake them up.  Even though they are adults now, it's still all about "the kids" at Christmas, and when they finally do get out of bed they are looking for the BIG Christmas breakfast that awaits them.  This year I made Baked French Toast with Pure Maple Syrup (the recipe is below), Home Fries, and Brown Sugar Sausage. This recipe is so easy because you prepare it the night before and then bake it in the morning. The recipe is below.

Doesn't this look yummy? It was!
Baked French Toast

Ingredients
cooking spray
1 loaf of Challah Bread, sliced in 1 inch thick slices
8 large eggs
2 cups half and half
1 cup of skim milk
3 tablespoons of sugar
2 tsp vanilla extract
1/2 teaspoon cinnamon
1/4 teaspoon nutmeg

Directions
Slice the bread into about 20 slices.  Spray a 9 x 13 baking dish with the cooking spray. Arrange slices in rows, overlapping them.  In a large bowl, combine the eggs, half and half, milk, sugar, vanilla, cinnamon and nutmeg. Whisk it together until all of it is blended but not too foamy.  Pour the mixture evenly over the bread and spoon some in between all the slices, making sure all the bread is covered.  Cover and refrigerate overnight.

Next morning, preheat oven to 350 degrees, and bake for 40-50 minutes.  The last 15 minutes of baking take the foil off and let it brown on top.  Serve with Maple Syrup.  Makes 6 - 8 servings.


Thursday, December 26, 2013

Wonderful Light Dessert - The Eclair Cake

A friend gave me this Eclair Cake recipe over 20 years ago, and I make it all the time.  It is a fast, easy, elegant dessert to make for a special occasion, and feeds a crowd.  I altered the recipe to make it a little less fattening too, for anyone who worries about that, but it did not change the flavor of the cake at all, so a double high five on that!  Recipe below.

A few of my ingredients, and use a 9 x 13 baking dish and spray with a little cooking spray (instead of butter - less fat).  You can use fat free graham crackers, I didn't have them so I used regular.  Layer graham crackers on the bottom, don't worry if some are broken just try to match the pieces, and fill in with half and quarter pieces.  It all gets covered so no one will see it. 
 Now here is best part, I use fat free - sugar free instant pudding and mix it with skim milk - less fat and sugar already!
 Then I use light or fat free-sugar free whipped topping - even less fat and sugar!
 First layer of crackers and pudding and start the second layer.
 Second layer.  At this point cover and put into the refrigerator to set up for 2 -3 hours.  Take it out, and it's time to frost it.
 Open the frosting and take off the foil seal, be sure to remove before putting in the microwave!  Microwave for 30 seconds.  Take out and stir until smooth.  Pour and gently spread over the cake. 
 Oui, Oui! Eclair Cake at it's finest.  It's light, fluffy and not too bad on the waistline.

Eclair Cake

Cooking Spray
1 box Nabisco Honey Maid Graham Crackers (do not use the cinnamon flavored, but you can use fat free)
2 - 1.4 oz boxes of Jello Instant Fat Free - Sugar Free Vanilla Pudding
3 Cups of Skim Milk
1 - 8 oz container of fat free/sugar free whipped topping
1 can of Pillsbury regular chocolate frosting

Spray a 9 x 13 baking dish with cooking spray.  Line with 1 layer of crackers, set aside.  In a large mixing bowl, combine the pudding and the milk.  With an electric mixer, beat at medium speed for 2 minutes, until it becomes somewhat thick.  Fold in the whipped topping with a spatula.  DO NOT MIX WITH THE MIXER!  
Pour half the mixture over the crackers, then place a second layer of crackers over the pudding mixture. Repeat with remaining pudding and cover with more crackers (you will have crackers left over).  Refrigerate for 2 - 3 hours.

To frost:  Open can of frosting and remove the foil seal.  With the lid off, microwave for 30 seconds.  Take out and stir until smooth.  Pour and spread very gently over the top layer of pudding. Refrigerate until ready to serve.  Cover and refrigerate any leftovers.


Wednesday, December 25, 2013

Merry Christmas and Happy Holidays!

I decided to take the day off today to spend with my family.  I am cooking dinner Christmas dinner for everyone  - 11 people. I love nothing more than having my family around me during the Christmas holidays.  Everyone catches up with their lives, the kids are home from college, we all share and remember family stories and laugh so hard sometimes we cry.  It truly is the most wonderful time of the year - after all the prep work is done! Thank you all for logging onto and staying interested in my blog, I appreciate all of you.  Have a wonderful holiday.

  Merry Christmas and Happy Holidays!


Tuesday, December 24, 2013

Homemade Chocolate Fudge

My mother knew her way around the kitchen and wasn't afraid to try new things.  One  favorite of hers was candy, she loved candy, and we affectionately called her "The Candy Queen" (she ate a little too much candy!).  She also knew how to make it.  She would make Old Fashioned Red Candy Apples for Halloween, Chocolate Dipped Coconut and Peanut Butter Eggs for Easter, and Peanut Butter and Chocolate Fudge for Christmas.  My youngest daughter, has been dubbed the new "Candy Queen" in our family, because like my mother, she eats a little too much candy!  This is the recipe she used for her Chocolate Fudge. Enjoy, just like we do over the Holidays!


Homemade Chocolate Fudge


INGREDIENTS
3 cups  sugar
¾ cup  butter or margarine
1 small  can (5 oz.) evaporated milk (about 2/3 cup) (Do not use sweetened condensed milk.)
1 12 oz package Semi-Sweet Chocolate Chips (or use three – 4 ounce bars of semi sweet chocolate, chopped)
1 jar (7 oz.) Marshmallow Creme
1 tsp.  vanilla

DIRECTIONS
Line a 9-inch square pan or baking dish with foil, with the ends of the foil extending over sides. Bring sugar, butter and evaporated milk to full rolling boil in 3-qt. saucepan on medium heat, stirring constantly. Cook 4 min. or until candy thermometer reaches 234°F, stirring constantly. Remove from heat.
Add chocolate and marshmallow creme; stir until melted. Add vanilla; mix well.
Pour into prepared pan; spread to cover bottom of pan.  Cool completely. Use foil handles to lift fudge from pan before cutting into squares.


Monday, December 23, 2013

The Fabulous Gingerbread Boys (And Girls)!

Nothing says it's Christmastime more, than the smell of Gingerbread baking in the oven.  The scent of cinnamon, cloves, allspice, ginger and nutmeg combined together is so sweet.  These are a favorite of my son and daughter, and I have to hide them so they don't eat them all!  Simply decorated, because they don't need much, to make them taste so good.  Recipe below. 


Some of the ingredients that I used for the dough. It has alot of ingredients, but don't be afraid of that, it mixes very quickly, and the cookies are awesome!
This dough is simple to pull together and easy to roll out.
 Cutting the gingerbread boys and girls.
 Pre-decoration, but looking pretty cute!
 Baked and decorated.  Boys with bow ties and Girls with snowflake eyes and holding candy canes.  I also used cookie stamps on some of them.
 Pretty little reindeer, just waiting to be eaten.

Gingerbread Cookies

Ingredients
3 cups of unbleached flour
1 tsp. baking soda
2 Tbsp. ground ginger
1 tsp. cinnamon
1/4 tsp. ground cloves
1/4 tsp. allspice
1/8 tsp. nutmeg
1/4 tsp. salt
1 stick butter, softened at room temperature
1/4 cup Crisco shortening, at room temperature
1/2 cup packed brown sugar, light or dark
2/3 cup of molasses
1 large egg, at room temperature

Directions
In a medium bowl, whisk together the flour, baking soda, spices, and salt, set aside.  In a large bowl of an electric mixer, on medium-high speed, cream the butter and the shortening together.  Add the sugar and beat until fluffy. Beat in the molasses and the egg.  Scrape the sides of the bowl, then gradually stir in the flour mixture to form a stiff ball of dough.  Divide the dough in half and flatten to form two discs.  Wrap in plastic wrap and refrigerate for 4 hours or overnight.  Remove from refrigerator 30 minutes before rolling.

Preheat oven to 350 degrees.  Line baking sheets with parchment paper, set aside.  Roll out one disc at a time, on a lightly floured surface to 1/8 inch thickness.  Cut out cookies with shapes of your choice and place 1 inch apart on baking sheets.  Decorate as you like with jimmies/sprinkles, or leave some cookies plain, and after they are baked frost with icing. Gather scraps and re-roll them to form more cookies.  Repeat with remaining dough. (TIP:  If cookies have too much flour on top lightly dust them off with a dry pastry brush)

Bake cookies for 10-12 minutes, switching sheets top to bottom rack, and front to back, halfway through baking for evenness of color.  Let cool about 5 minutes before removing from baking sheets.  Transfer the cookies to a cooling rack.  Store in airtight containers.  Makes about 36 cookies.

NOTE: These can also be decorated with frosting.  Recipe below.

Royal Icing

3 Tbsp. Meringue Powder
4 cups of confectioner's sugar
5 - 6 Tbsp. warm water (for stiffer icing use 5 Tbsp. water)

Beat all ingredients until icing forms peaks, about 7-10 minutes at low speed with a heavy duty mixer, or 10-12 minutes with a hand held mixer.  Recipe makes 3 cups.  Tint as you like with liquid, gel or powdered food coloring.  To frost use a pastry bag and small tips or ziploc bag with an end snipped off.  Pipe around the edges first then use a small pallet knife to fill in the frosting.

This is a smooth and hard drying, edible icing, so to keep from drying out place a dampened paper towel over your bowl while you are working with it.  This icing is NOT recommended for frosting cakes.